• Skip to primary navigation
  • Skip to main content
  • Skip to primary sidebar

Creative Housewives

  • Recipes
  • Crafts
  • Holidays
  • Family
  • Meet the Housewives
  • Contact Us
Home ยป birthdays ยป Chocolate Candy Cake – R’s birthday

Chocolate Candy Cake – R’s birthday

By Creative Housewives 24 Comments

When I saw a picture of this cake, I just KNEW I had to make it for someone!  Lucky for me, R’s birthday is in a couple of days, but we had a combined party for him, H, and my niece yesterday.  I showed him a picture of the cake and he loved it!
First you are going to start with your favorite kind of cake.  We wanted an extra chocolate-y cake, so we used devil’s food cake.  I used 9″ pans and two cake mixes.  After baking, I let the cakes cool completely (over night) and then frosted with a crumb coat.  Not too much, but enough to make sure the candy would stay on!
 Next, Jenn helped me by separating all of the M&M’s by color!
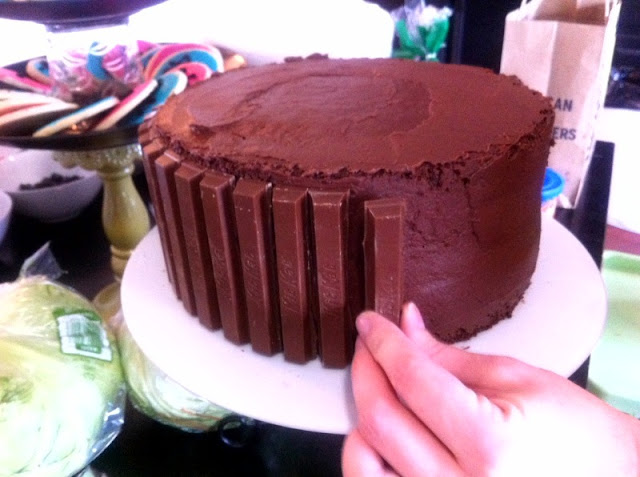
Then we broke out the Kit Kat bars.  I used about 3.5 king size packs (9.5 regular size packs).  Break them up so you can place them on the cake.
 Now start placing your Kit Kat bars side by side.  Now remember, I used two 9″ cakes, leveled and stacked.  The kit kats reached almost to the top of the stacked cakes.
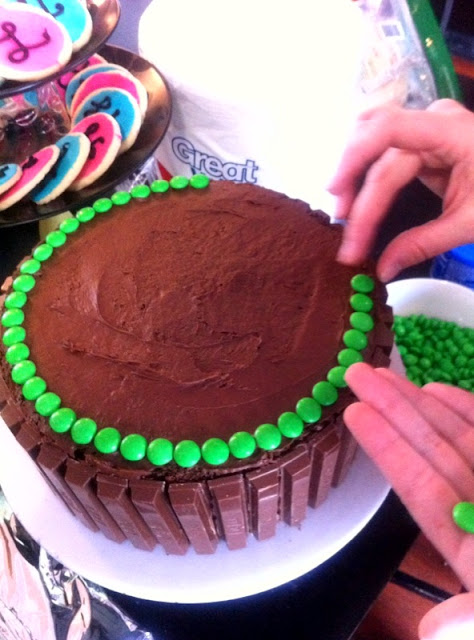
Now start placing your M&M’s.  You can do any color scheme you want.  We noticed that there seemed to be more green, blue and orange M&M’s in the bag than the other colors.  So we started with those. 🙂
To cover the space between the Kit Kats and the M&M’s, I used some of the left over chocolate frosting and a star tip to make a cute border around the top and bottom of the cake.  Finish off with a matching ribbon and candles and there you have it!
The happy, almost 9 year old and his Candy Cake!  He was SOOOO sweet about it!  He kept coming up to me all night saying “I just can’t stop smiling and telling you thank you for my cake!”  What a sweet boy!
This cake was very simple, but slightly time consuming because of placing the candy.  It was a HUGE hit and tasted delicious!

Linked up here:
So Creative Sundays
DIY Project Parade
Not Baaaad Sundays
Sundae Scoop
Think Pink Sundays
Linky Party Sundays
Melt In Your Mouth Mondays
Just Something I Whipped Up Mondays
Makin’ You Crave Mondays
Market Yourself Mondays
Made By You Mondays
Masterpiece Mondays
Meatless Mondays
Time To Shine Mondays
MoMomma Mommy Mondays
Mushki Loves My Stuff
A Round Tuit
What’s In The Gunny Sack
Tasty Tuesdays
Tea Party Tuesdays
Totally Tasty Tuesdays
Tempt My Tummy Tuesdays
2 Maids a Baking
What’s Cookin’ In The Kitchen
Topsy Turvy Tuesdays
Tutorial Tuesdays

© The REAL Housewives of Riverton, 2011-2012. Unauthorized use and/or duplication of this material without express and written permission from this blog’s authors and/or owners is strictly prohibited. Excerpts and links may be used, provided that full and clear credit is given to The REAL Housewives of Riverton with appropriate and specific direction to the original content.

Filed Under: birthdays, cake decorating

Previous Post: « Christmas Tradition – St. Nicholas Day
Next Post: Ruffle Cakes »

Reader Interactions

Comments

  1. Kim

    December 13, 2011 at 2:19 pm

    Very cool cake! Happy birthday R!

    Reply
  2. Paula

    December 13, 2011 at 3:42 pm

    Thank you Kim!!

    Reply
  3. Winnie

    December 13, 2011 at 4:26 pm

    Stunning looking cake! No wonder he looks so happy ๐Ÿ™‚

    Reply
  4. Paula

    December 13, 2011 at 4:45 pm

    Thank you Winnie!

    Reply
  5. Kirsten @ Mushki Loves

    December 13, 2011 at 7:00 pm

    Thanks for linking up to Mushki Loves! I Love it! Thank you for sharing! I’m featuring this on my facebook page!

    Loves,
    Kirsten

    Reply
  6. Paula

    December 13, 2011 at 7:22 pm

    Thank you Kirsten!! I really appreciate that!

    Reply
  7. Jill

    December 14, 2011 at 1:49 am

    Fabulous cake – certainly worth all that effort! And I love your cool curly candles too!

    Thanks for linking to a Round Tuit!
    Hope you have a great week!
    Jill @ Creating my way to Success
    http://www.jembellish.blogspot.com/

    Reply
  8. Paula

    December 14, 2011 at 2:05 am

    Thank you Jill!

    Reply
  9. Jen Lossing, The Consigner Designer

    December 14, 2011 at 3:52 am

    This looks amazing! I want to lick my computer screen. Ha Ha. Great job! It’s so pretty. I bet it tastes even better!

    Reply
  10. Paula

    December 14, 2011 at 4:08 am

    Thanks Jen! It was really good! Very chocolatey!

    Reply
  11. Trish - Sweetology101

    December 14, 2011 at 9:58 pm

    this candy cake is AMAZING! you did a GREAT job, so glad you shared it.

    Reply
  12. Paula

    December 14, 2011 at 10:01 pm

    Thank you Trish! It was really fun and easy to make!

    Reply
  13. Jaime

    December 18, 2011 at 12:50 am

    Featured you!

    http://polkadotsonparade.blogspot.com/2011/12/foodie-friday_17.html

    Reply
  14. Paula

    December 18, 2011 at 3:25 am

    Thank you for the feature Jaime!! ๐Ÿ™‚

    Reply
  15. A Few Pennies

    December 19, 2011 at 12:30 am

    That has to taste absolutely amazing! Thanks for sharing and Merry Christmas!

    Reply
  16. Tonia @ TheGunnySack.com

    December 19, 2011 at 3:37 am

    Thanks for sharing you recipe at What’s In The Gunny Sack! I wanted to let you know that I featured your recipe today!

    Reply
  17. Donna Ganas

    January 2, 2012 at 6:01 pm

    I love this. It’s absolutely beautiful, colorful, and oh so cheerful! I can’t think of anyone who wouldn’t adore having a cake like that on their birthday!

    Reply
  18. Anonymous

    January 2, 2012 at 6:36 pm

    You can also go to the Jelly Belly Factory or any place that sells candy in bulk and get the colored candies pre sorted. Death by chocolate! What a way to go!

    Lori in Wisconsin

    Reply
  19. Betsy

    January 2, 2012 at 9:18 pm

    I love this idea. I’m thinking of trying it in a smaller version – still 2 layers high – but smaller around. That would be cute, too!!

    Reply
  20. Paula

    January 3, 2012 at 5:00 am

    Thank you so much everyone!! ๐Ÿ™‚

    Reply
  21. Sarah

    March 12, 2012 at 6:09 pm

    I love it. I made one for my son’s first birthday a month ago and it was a big hit!
    http://ajsarahbobofamily.blogspot.com/2012/02/how-to-on-m-kit-kat-cake.html

    Reply
  22. Anonymous

    March 21, 2012 at 10:23 pm

    I pinned your beautiful cake so it will be ‘near me’ when I need it. Found only one problem in doing it. I wanted to use the picture of “R” instead of the actual cake. What a priceless picture!!! Makes me miss my grandkids so very much…. I’d sign this but don’t know how, so had to go with Anonymous.

    Reply
    • Paula

      March 21, 2012 at 11:34 pm

      Oh my goodness! Thank you so much! He really loved it so much and was just so sweet about it. ๐Ÿ™‚ Thank you for your kind comment, I really do appreciate it!

      Reply

Leave a Reply Cancel reply

Your email address will not be published. Required fields are marked *

This site uses Akismet to reduce spam. Learn how your comment data is processed.

Primary Sidebar

Search Creative Housewives

In the spirit of full disclosure, our posts may include affiliate links, which means that we may get a commission if you decide to purchase anything from the link. You will not pay more shopping through these links.

The Housewives of Riverton is a participant in the Amazon Services LLC Associates Program, an affiliate advertising program designed to provide a means for sites to earn advertising fees by advertising and linking to Amazon.com.

View more awesome posts →

Copyright © 2021 creativehousewives.com. All rights reserved. PRIVACY POLICY.