This post may contain affiliate links. If you purchase something through any link, we may receive a small commission at no extra charge to you. Supplies used may be given to us free of charge, all projects and opinions are my own.
So those cute onesies I did, well in the beginning I was thinking I would turn it into a tutorial and so I started taking pictures of the process but then it was like 3am and I kind of forgot to keep taking pictures and I also changed my mind a couple of times about what I was doing so I think that added to my forgetfulness.
Anyway (I almost typed irregardless because Paula and I always use that word wrong on purpose because someone we once knew did it all the time and it still makes us giggle….yes we are very adult and mature-like)…ANYWAY, I do have some pictures and I am incredibly long winded so I can probably give you a good idea of what I did even if I don't have pictures.
Step 1 – ALWAYS STEP 1 WHEN SEWING…..(yep I did yell a bit there) wash your fabrics – wash the onsies, wash the cute fabrics, do all of the washing 1st, got it?…good.
Step 2 – Grab something that is the size of circle you want to you use (for me it was a nice big cup), you can use a cricut, silhouette, die-cut machine or anything like that to cut your circles for you, I haven't ventured there with my cricut yet but plan to soon.
Cut out your circles.


Step 3 – (for me this time because I had a total “I'm an idiot” moment and didn't do this step first) trace your circles onto your wonder under and cut out all those puppies too!

It wasn't awful, Friends was on TV but this step could have totally been avoided if I had ironed my wonder under onto my fabric before cutting out my circles – I just got ahead of myself.
Step 4 – not pictured – iron the wonder under circles onto your fabric circles (could be step 2 if you do this right – am I confusing you yet?…..iron the wonder under onto your fabric before you cut out your shapes so you don't have to cut the shape out twice).
Step 5 – Iron your circle onto your onsie!

Step 6 –
Freezer paper!

Do you know about freezer paper and how awesome it is? I didn't until about a year ago (sad I know). Freezer paper is like shiny on one side – you can use it as a stencil! There are options, I think I've done them all – x-acto knife & self healing mat, cricut, whatever you want to use to cut out your image. You want the shiny side down because when you put it on your fabric and iron it down it sticks to it!! Brilliant right? It is almost a leak proof seal every single time (check your edges, it can bubble up and not seal all the way down). I've done a few shirts with pretty intricate stuff and they came out awesome!
So what I did was (thanks to Gena) loaded all my images onto her gypsy

I then set my cricut to the slowest speed it has about almost to the highest pressure (not sure if that was necessary but I wasn't taking chances) and put a piece of freezer paper on my mat so the gypsy could tell the cricut to cut it out!
I have no pictures of the last steps, I am so sorry and will do my best to get a complete picture filled tutorial up soon!
Step 7 is to position your cut out stencil on top of your cute little circle and then using a small brush and FABRIC paint, paint your image. Do your best to paint from the edges to the center, this will help you not push paint under your seal. Typically you can tell pretty quickly if paint is getting under, if that happens you have to decide for yourself what you want to do. It did happen to me on the M's a little bit (I think because they were so small) and for me, I wasn't starting over so I let it dry a little bit and then scraped the paint off the best I could, I don't think it was glaringly obvious anywhere and it just confirms that I made them and didn't buy it somewhere right?
I painted 1 coat on each of the onsies and then did a 2nd and on some a 3rd. Using white over the colors was the need for more paint. If I had had more time I probably would have done more layers since when I pulled the freezer paper off there were parts that were still a bit see-through (when I used black on a grey shirt this past summer it was like 1 coat and perfection – obviously darker paint, lighter fabric = less paint).
Step 8 is to pull off your freezer paper and that is all you have to do, just pull it off, it is so awesome (I am starting to wonder if it would work on like wood and stuff….what do you think?…maybe I'll try it and let you know!)
Step 9 is where I changed my mind. I had intended to machine applique the edges of the circles…that was until I put the onsie into the machine and I realized it was going to cause me serious stress and I would be taking out a lot of stitches because they were so little. I was stressing for a moment and was seriously considering making this a “at the hospital” gift and taking out the side seam of the onsie to give myself more room (and time) to work but I was afraid if I put it off that baby would come early and his present wouldn't be done!
That is what I decided to do and that is why all the circles have white paint outlines, it essentially does the same thing as the stitches and I didn't have to use my sewing machine in tiny places to do it.
A close up of the paint sealed edges


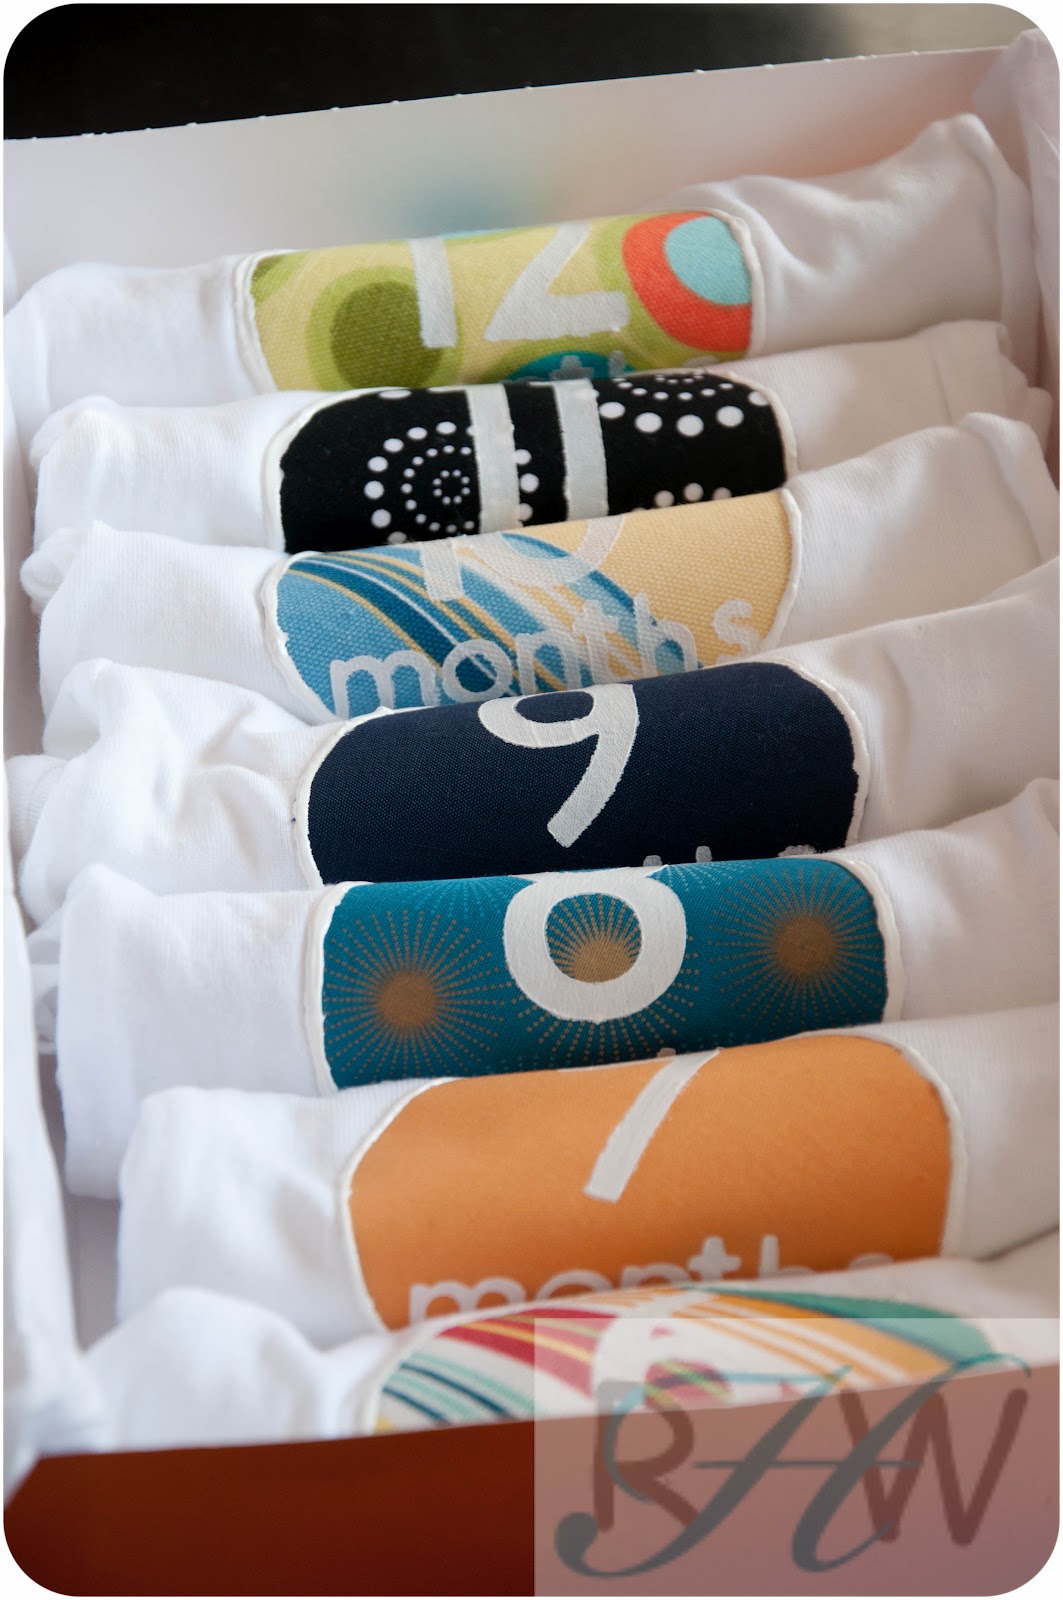
So, there you are! An almost complete tutorial for monthly onsies my way! Of course I'd love for you to come share your applique tips and tricks and pictures if you decide to tackle the onsies yourself!!!
OH and 1 more thing! If you're wondering what size onsies I used I will share that information with you now
Brand new & 1 month onsies are newborn up to 8lb size
2, 3 & 4 month onsies are 0-3 month size
5, 6, 7, 8 are 3-9 month size and
9-12 are 12 month size
They are all gerber brand and I went off the weight more than the month and kind of went along with what my last few babies have worn at that age.
© The REAL Housewives of Riverton, 2011-2012. Unauthorized use and/or duplication of this material without express and written permission from this blog’s authors and/or owners is strictly prohibited. Excerpts and links may be used, provided that full and clear credit is given to The REAL Housewives of Riverton with appropriate and specific direction to the original content.
Latest posts by Creative Housewives (see all)
- The Best Vinegar Paint Brush Cleaner Method - May 6, 2023
- 10 Fun and Easy St. Patrick's Day Games - March 1, 2023
- Valentine's Day Felt Wreath DIY - January 20, 2023

VERY CUTE. I really like this as a gift and will try it!