This post may contain affiliate links. If you purchase something through any link, we may receive a small commission at no extra charge to you. Supplies used may be given to us free of charge, all projects and opinions are my own.
 HAPPY ST. PATRICK'S DAY!!!
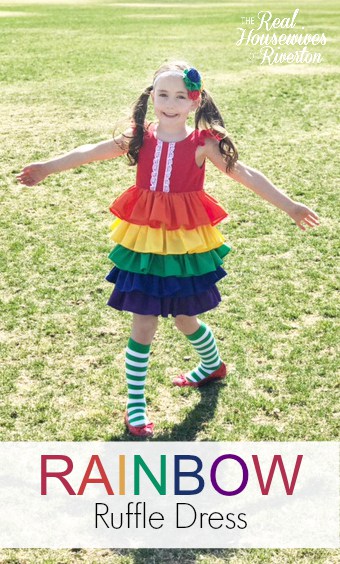
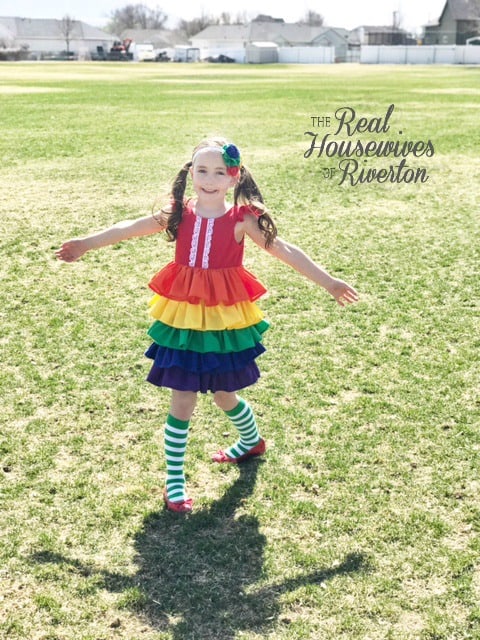
What better way to celebrate than with a tutorial (finally) for our ever popular Rainbow Ruffle Dress.
If you've been following us since the beginning you may remember the first Rainbow Ruffle Dress I made when Lila was just over a year old:
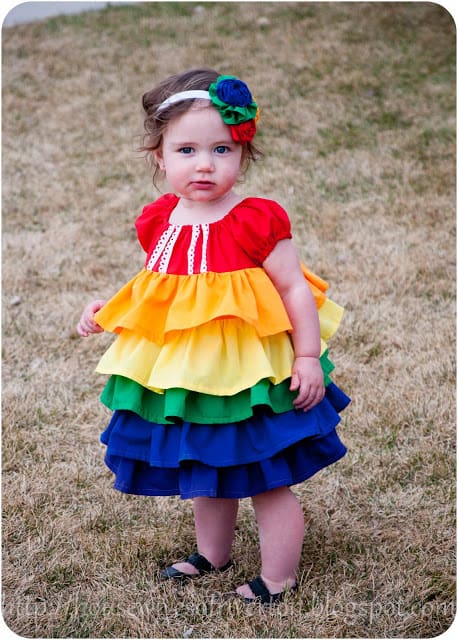
I still adore that dress, so much that she wore it for St. Patrick's Day 2012, 2014, and again in 2016 as a top. Now that Lila is 6 we needed a new Rainbow Ruffle Dress and guilt finally got to me, after years of people asking “how did you do that” I finally sat down and created the new Rainbow Ruffle Dress and kept track of what I did so I could share it with you.
Let me be clear up front. I am considering this an intermediate project because while it's not hard I am not giving you an actual pattern and you need to have some basic sewing knowledge. Feel free to ask questions if you need me to clarify something and I'll do my best to answer them!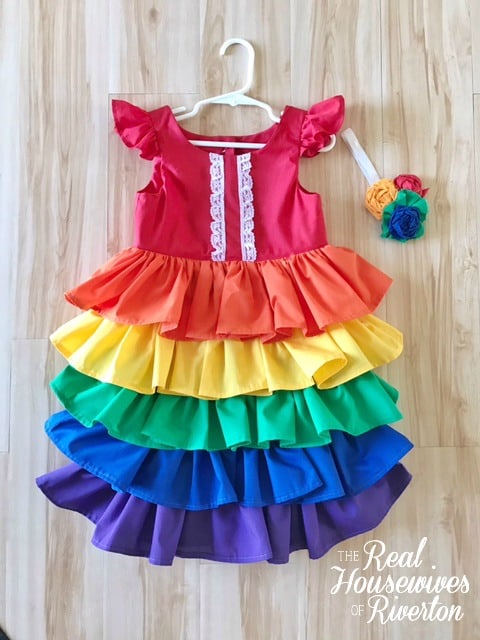 Because there is not an actual pattern for this dress I am going to tell you how I did it. If you've sewn before I have no doubt that you'll be able to figure out how to make this dress exactly how you would like it. It's easy to customize the bodice (as you can see the original dress was a peasant dress style bodice and the updated one is a flutter sleeve bodice) and I'll walk you through how I did the ruffled skirt. This will all need to be adjusted for your child's size. Oh, and there is math…you've been warned!
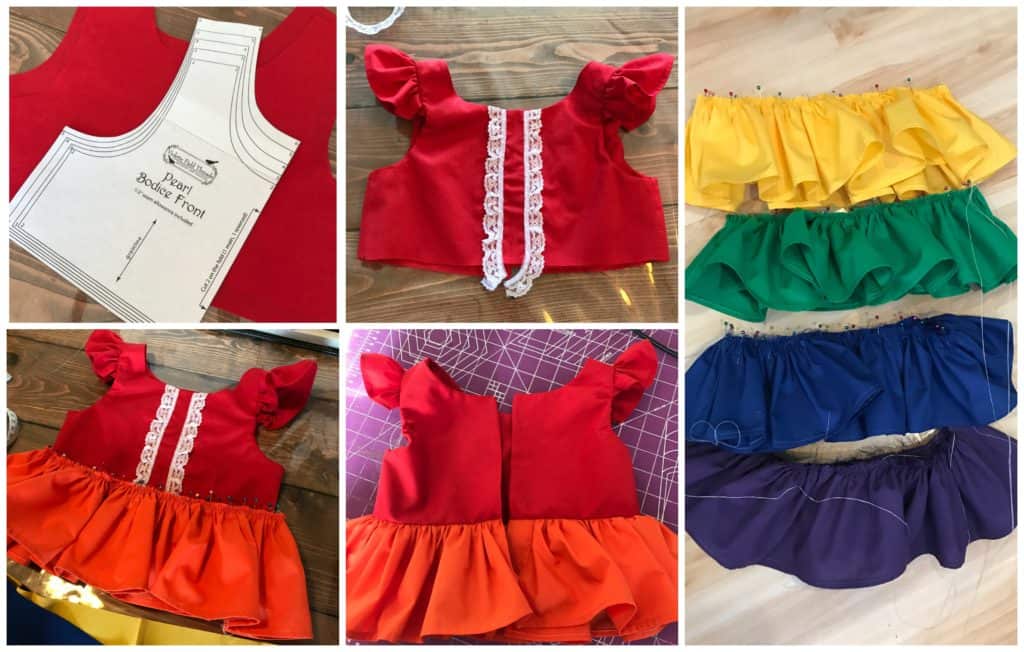 For the updated dress I used the Pearl Dress bodice pattern with flutter sleeves from Violette Field Threads. I recently made another dress with this pattern and really liked how it fit Lila. Because Lila is super skinny and tall I cut my bodice at a size 6 length but a size 5 width. I put together the bodice as their pattern describes except I just attached the lining piece to the orange ruffle layer instead of keeping it out, since I finished the seam I wasn't concerned with it being enclosed (#lazy).
This is getting a little ahead of myself because I haven't told you how to do the ruffles yet but while we're talking patterns to make it easier to get the dress over her head (I wanted it a little more fitted than the original Rainbow Ruffle Dress) I did a placket closure. The Pearl Dress doesn't include this, that pattern is reversible and buttons all the way down the back. If you know how to do this awesome you're ahead of the game and me! If you don't know how to do this the Clara Dress pattern also from Violette Field Threads attaches the skirt to the bodice with a placket and explains it well. I had never done a placket before this past week and now I've done 3 and use that pattern each time, it helps me get it right each time.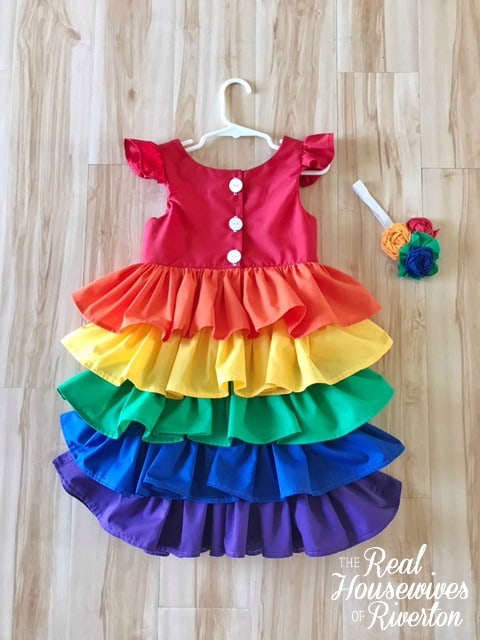 This shows how the back will look finished with the button/placket closure.
For the assembly of the dress you need to decide how long you want your total dress to be when it's finished. I knew I wanted my dress to be about 24″ long so once my bodice was finished I measured it (subtracting 1/2″ seam allowance – using 1/2″ seam allowance makes doing the math easier for me). It ended up being 8″ long so next step:
24″- 8″ = 16″
I needed my skirt length to end up being 16″ long.
I want ruffles to be at least 2″ longer than the piece that attaches them because this helps completely cover that attaching piece and the ruffles lay on top of each other nicely. You could easily make them 3″ longer if you wanted, this will definitely make them more layered/fluffy.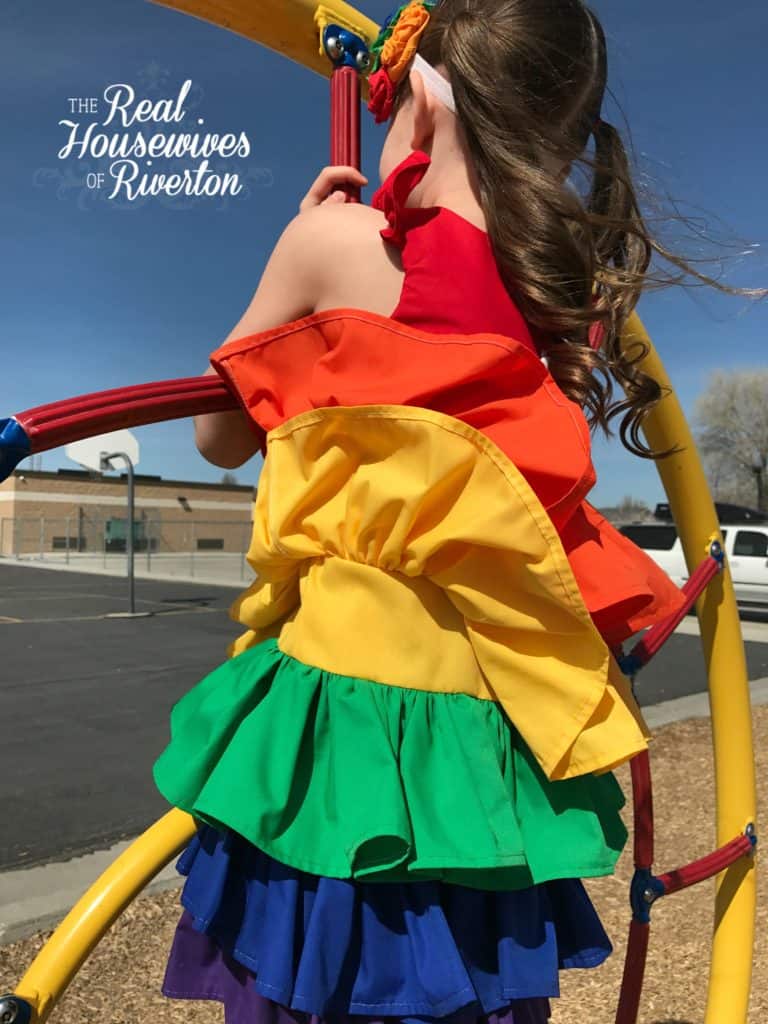 Apparently I didn't get a photo of the attaching layer when I was putting the dress together so you get this lovely windy photo. Because we want each ruffle to be independent and able to be ruffled and fluttery we don't want to sew them together, so you're going to have an attachment piece under the ruffle, you want it to match the ruffle layered over it.
Measuring process:
Lay your red bodice out flat with the front up and measure it. Times that by 2 and add an inch. That is how wide you will want to cut your orange attachment piece. The length of the piece will depend on your math for my dress the measurements went as follows (this is getting wordy, sorry!)
8″ finished red bodice
3″x 26″ finished Orange
3″x 26″ finished Yellow
3″x 27″ finished Green
3″x 27-28″ finished Blue
attachment pieces
This gives me a dress that is 20″ long without the purple ruffle layer (because it doesn't need an attachment piece)
Since I want my ruffles to be 2″ longer than the attachment piece adding the purple ruffled layer I end up with a dress right at about 25″ long.
For Lila's dress I cut all my attachment pieces 4″x 26.5″ (because I use 1/2″ seam allowance this gives me a finished measurement of 3″x 26″). As you can see in the photos it fits her great and is so cute BUT it is a little snug around her bum. I suggest (as per my measurements up there) adding at least an inch on the green and blue attachment pieces to give a little more wiggle room around the bum/hip/leg area.
So if you were making my exact dress you will have
Orange, Yellow, Green, and Blue pieces cut 4″x 26.5-28.5″ for your attachment pieces. For each of these you will sew short sides together with 1/2″ seam allowance creating a tube. You do not need to hem either of the long edges because you will be connecting both edges to ruffles and other attachment pieces.
Once you have all those done you need to decide how ruffled you want your ruffles. I know a good rule of thumb is 1.5-2x the width of what you're attaching to. To make my life easier and my ruffles very full I cut 2 pieces the width of the fabric.
 Orange, Yellow, Green, Blue, Purple ruffle pieces cut 6″x width of the fabric x 2
Sewn short ends together I would say that is a ruffle about 6″x 84ish”.
Sew short ends together and hem one long end. I burned myself to a crisp on my right arm measuring up 1/4″ ironing and then another 1/4″ ironing to get a nice crisp clean hem. I am learning there are other ways to do this so if you know them, use them!
Once your hems are done on the opposite end do two long gathering stitches one at 1/4″ and one at 3/8″. Pull the bobbin thread and gather until your finished ruffle is the same size as your attachment piece. Distribute ruffles evenly and pin to attachment piece. To pin them together you'll place the attachment piece inside the ruffle piece so that the right side of the attachment piece is touching the wrong side of the ruffle piece. Once you have all of them done you can start putting them together.
Start with Orange, pin the attached ruffle and attachment pieces of orange to the bodice (after following the instructions as per the Clara pattern {or other pattern you may use} for the placket) right sides together and using a straight stitch sew them together with a 1/2″ seam allowance. Once it's sewn together remove pins and flip it over and look it over well, if you've caught all your ruffles and things look good trim off half the seam allowance either using a serger or trim with scissors and finish the seam with a zigzag stitch.
You'll do the exact same thing (minus placket) for yellow, green, and blue.
When you get to purple it's a little easier because you're just sewing the ruffle to the bottom of the blue attachment piece.
 Am I a jerk if I don't walk you buttonholes? I personally hate them because I haven't mastered them and always get frustrated with them but I'm going to learn dang it. The dress requires buttons so you'll have to do them. I just did 3, I don't feel like you need any in the placket area, having one right above it holds things together perfectly with no gaping (at least on a size 5/6).
So there you go. Please ask questions if you need more information, hoping to get better at giving instruction without 1400 words to explain it.
I really really really hope if you make a Rainbow Ruffle Dress you'll be sure to tag us so I can see it! Doesn't it just look like the most fun dress to wear ever? I wonder if I could get away with one?…
 Happy Sewing!!!

- Bringing Home Baby Chicks - March 11, 2025
- Is RootsTech for Moms? - February 23, 2024
- How to Get Oil Stains Out of Clothes - May 5, 2023

[…] I have been sewing for years now. I’ve made my fair share of dresses, skirts, even some shirts and shoes. I’ve made pillows, pillow cases, and even a few baby blankets. There was a time when rag quilts were something I made as baby shower gifts and even for my own children. Rag quilts were fun and relatively easy and because of the fraying on the top having perfect lines and corners wasn’t a requirement. When the Cricut Maker came out in 2017 I was most excited about the Rotary Blade and the ability for the Maker to cut fabric. It’s taken me a while to get up the nerve to tackle making a quilt but this Dinosaur fabric from Riley Blake was calling my name and I knew I had to make a Dinosaur quit for Morgan. In this post we’ll be talking about the process of choosing a pattern, cutting the pattern pieces out with the Cricut Maker, and sewing the top of the dinosaur quilt together. With the help of our Instagram followers I selected the Riley Blake Happy Squares Quilt pattern in Design Space. I selected a few quilt patterns I liked the look of and then let them vote on which one I should make. I didn’t realize at the time that it is considered an advanced pattern. If I had realized, I might have talked myself out of making it, so I’m glad I didn’t know until I had it mostly sewn together. One of the great features about the quilt patterns in Design Space is that before you purchase your pattern you can see how much of each fabric you need and you can even review the entire pattern assembly pdf! This means you have the opportunity to look through the steps of each pattern to find the one exactly right for you and your project without having to purchase each one. I chose the Riley Blake Fossil Rim fabric collection for my dinosaur quilt and I am so pleased with how they look together. To prep the fabric for cutting on the Maker I cut each piece of fabric to 12″ wide. This is how wide the Cricut Maker can cut and makes putting the fabric onto the fabric grip mat so simple. Here is a tip (once you have your fabrics cut to size): Before you start cutting – using the Materials to Cut list above (this will be different depending on which pattern you select) write down which fabric number matches up with which fabric you’re using in that place. This will become especially helpful during the cutting phase. I second and third and even fourth guessed myself every time I put a mat into the machine so…take your time, read the instructions, and don’t skip ahead thinking you know what you’re doing. As you remove each mat from your machine remove the excess fabric from the mat first and then remove each piece. I found that starting at a corner and removing from the mat at an angle resulted in a nice clean cut piece of fabric. While you can cut all your pieces with one pink Fabric Grip mat, if you have more than one it definitely makes keeping the fabrics organized as they’re going into the machine much faster and even speeds up the cutting time since you don’t have to remove the fabric from the mat before you start cutting the next fabric. Once I had all the pieces of my quilt top cut I took a break for 10 days – HA! It was Valentine’s week, Anna and I headed to Arizona for a long weekend for a volleyball tournament, and you know…life! Once we were back in town I was ready to start sewing. I cannot stress enough the stress it will remove from the whole making process if you check and double check the pattern as you’re moving through each piece. Even though the pattern is just 1/4″ straight seams I pinned all my pieces together before sewing. This helped in 2 ways. 1. I knew as I was sewing my fabric would stay in place which would help with those strait lines and corners. 2. I was able to lay the pieces out on the table before sewing to make sure I was putting them down in order. Here’s real life friends! My craft room is my kitchen table and while I was sewing together this dinosaur quilt my family lovingly picnicked on the kitchen floor during meals. As you can see in this photo I have my big blocks sewn together and my strips sewn together and I’m working on laying out the rows. I probably laid this quilt out 8 different times, doing this though really did help me feel very confident as I was sewing that each piece was being sewn to the proper next piece. I will tell you this and will back it 100%, this quilt wasn’t HARD at all. It was a bit time consuming (not as bad as I was anticipating but it’s a quilt so…) but not difficult. Just take your time and follow the pattern and you’ll have a beautiful row of fabric all sewn together and once that happens you’ll be excited to do the next row, and the next, and the next. Once I had all the pieces sewn together I took a nap, and then I picked out the bottom strip row because the corners weren’t matching up as well as the other strips and rows were. That strip was the first row I attached and I thought I had done a pretty good job but when I was done it wasn’t as good as I had hoped. I heard my mom’s voice in my head “when making a quilt the most important part is your corners matching up” and decided I would sew the rest of the dinosaur quilt together and see if there was even a hope of the corners matching up the rest of the way before picking that row out. With a bit more patience during the pinning process I am happy to report that I think I have corners even my mom would approve of and removing the bottom row was no longer a question. It had to come off and adjustments had to be made. It was pretty painless and I am much happier with the final look having fixed that bottom row. Another thing I remember my mom repeating about most craft projects was that the back shouldn’t be a hot mess. She probably didn’t call it a hot mess back then but it’s definitely what she meant. If we were cross stitching or doing embroidery the back should look as good as the front. When she’s sewing clothing most of the time, all seams are encased and the inside of the garment looks beautiful. I know with quilts your seams should be pressed the right direction and excess threads should be trimmed up. That is where I am at right now, I have my seams pressed (if you have an EasyPress you should definitely have it out while you’re making your quilt. It was great for pressing the folds out of pieces before sewing and perfect for pressing the seams to the right side) but need to do some final thread trimming and then I’ll be ready for the 2nd part of our dinosaur quilt blog post. In the next post I’ll be showing you the final steps of the quilt: Picking the back fabric (I’m thinking a smooth finish grey minky) Sewing the back and front of the quilt together (with the batting in between) Binding the quilt and the actual quilting If you want to follow along with the finishing of the dinosaur quilt in real time make sure you’re following us on Instagram because I’m sharing the whole project there in stories! I have really enjoyed the process of making this dinosaur quilt. My favorite part so far has been Morgan sitting next to me from time to time commenting on each fabric and innocently asking “Mom, this is really for me right?…because it’s dinosaurs!” I haven’t told him yet it’s really his, because sometimes the anticipation is just fun as the gift itself. I’m hoping the next steps go as smoothly as the top has and I can’t wait to show you the finished product! So tell me, have YOU ever made a quilt before? If you have, did you cut all the pieces out by hand or did the release of the Cricut Maker finally convince you that with it’s help you could make a quilt too? Tell us in the comments, bonus if you have photos or a link to the quilt you made. Have a wonderful day and we’ll see you next time! If you’re not quite ready to tackle a dinosaur quilt here are a couple of my favorite dresses I’ve made and they’re the perfect dresses for St. Patrick’s Day and Easter coming up: Rainbow Ruffle Dress […]