This post may contain affiliate links. If you purchase something through any link, we may receive a small commission at no extra charge to you. Supplies used may be given to us free of charge, all projects and opinions are my own.
What does Flatten mean on Cricut Design Space? There are a lot of great features in Design Space that can help you create the perfect project. Flatten is an important tool if you want to create any type of printed image. Keep reading to learn how to use it and when to use it!
Looking for more Design Space tips? Click here to learn how to use Design Space offline.
What does Flatten mean?
Flatten is just one of many design features in Design Space and it's important if you want to do any printable projects.
When you flatten your image you're taking all the layers and turning them into one single image you can use for Print Then Cut projects.
You're flattening all the layers together to create one new image.
You can watch me walk through the Flatten tool, just click play on the video below:
What does Flatten do?
When you choose to flatten you're doing a few different things.
- Like I said above, you're taking all the layers from your current cut file and flattening them down into one single layer.
- A flattened image has no internal cut lines. Your new flattened image will have just one cut line around the exterior of the image.
- Your “basic cut” image is now a “Print Then Cut” image.
Need more information about Print Then Cut? Read all about it here.
Where Can I Find Flatten?
The Flatten tool can be used on both Desktop and Mobile apps.
On the desktop, it is at the bottom of your layers panel on the right-hand side of the canvas screen between Attach and Contour. You'll see it available to click when you have 2 or more layers selected.
You can also find it by right-clicking on your image. Flatten will be down at the bottom of the menu that pops up.
On the mobile app, you'll first click “Actions” and then select “Flatten”. The same steps apply, once you have 2 or more layers selected you will be able to click on the Flatten button.
When Should I Flatten My Cricut?
Anytime you want to combine multiple cut layers to create a print layer you'll use the Flatten tool. This is often for Print Then Cut projects.
You can also use it to combine shapes you want to turn into one shape that will be printed then cut out as one piece.
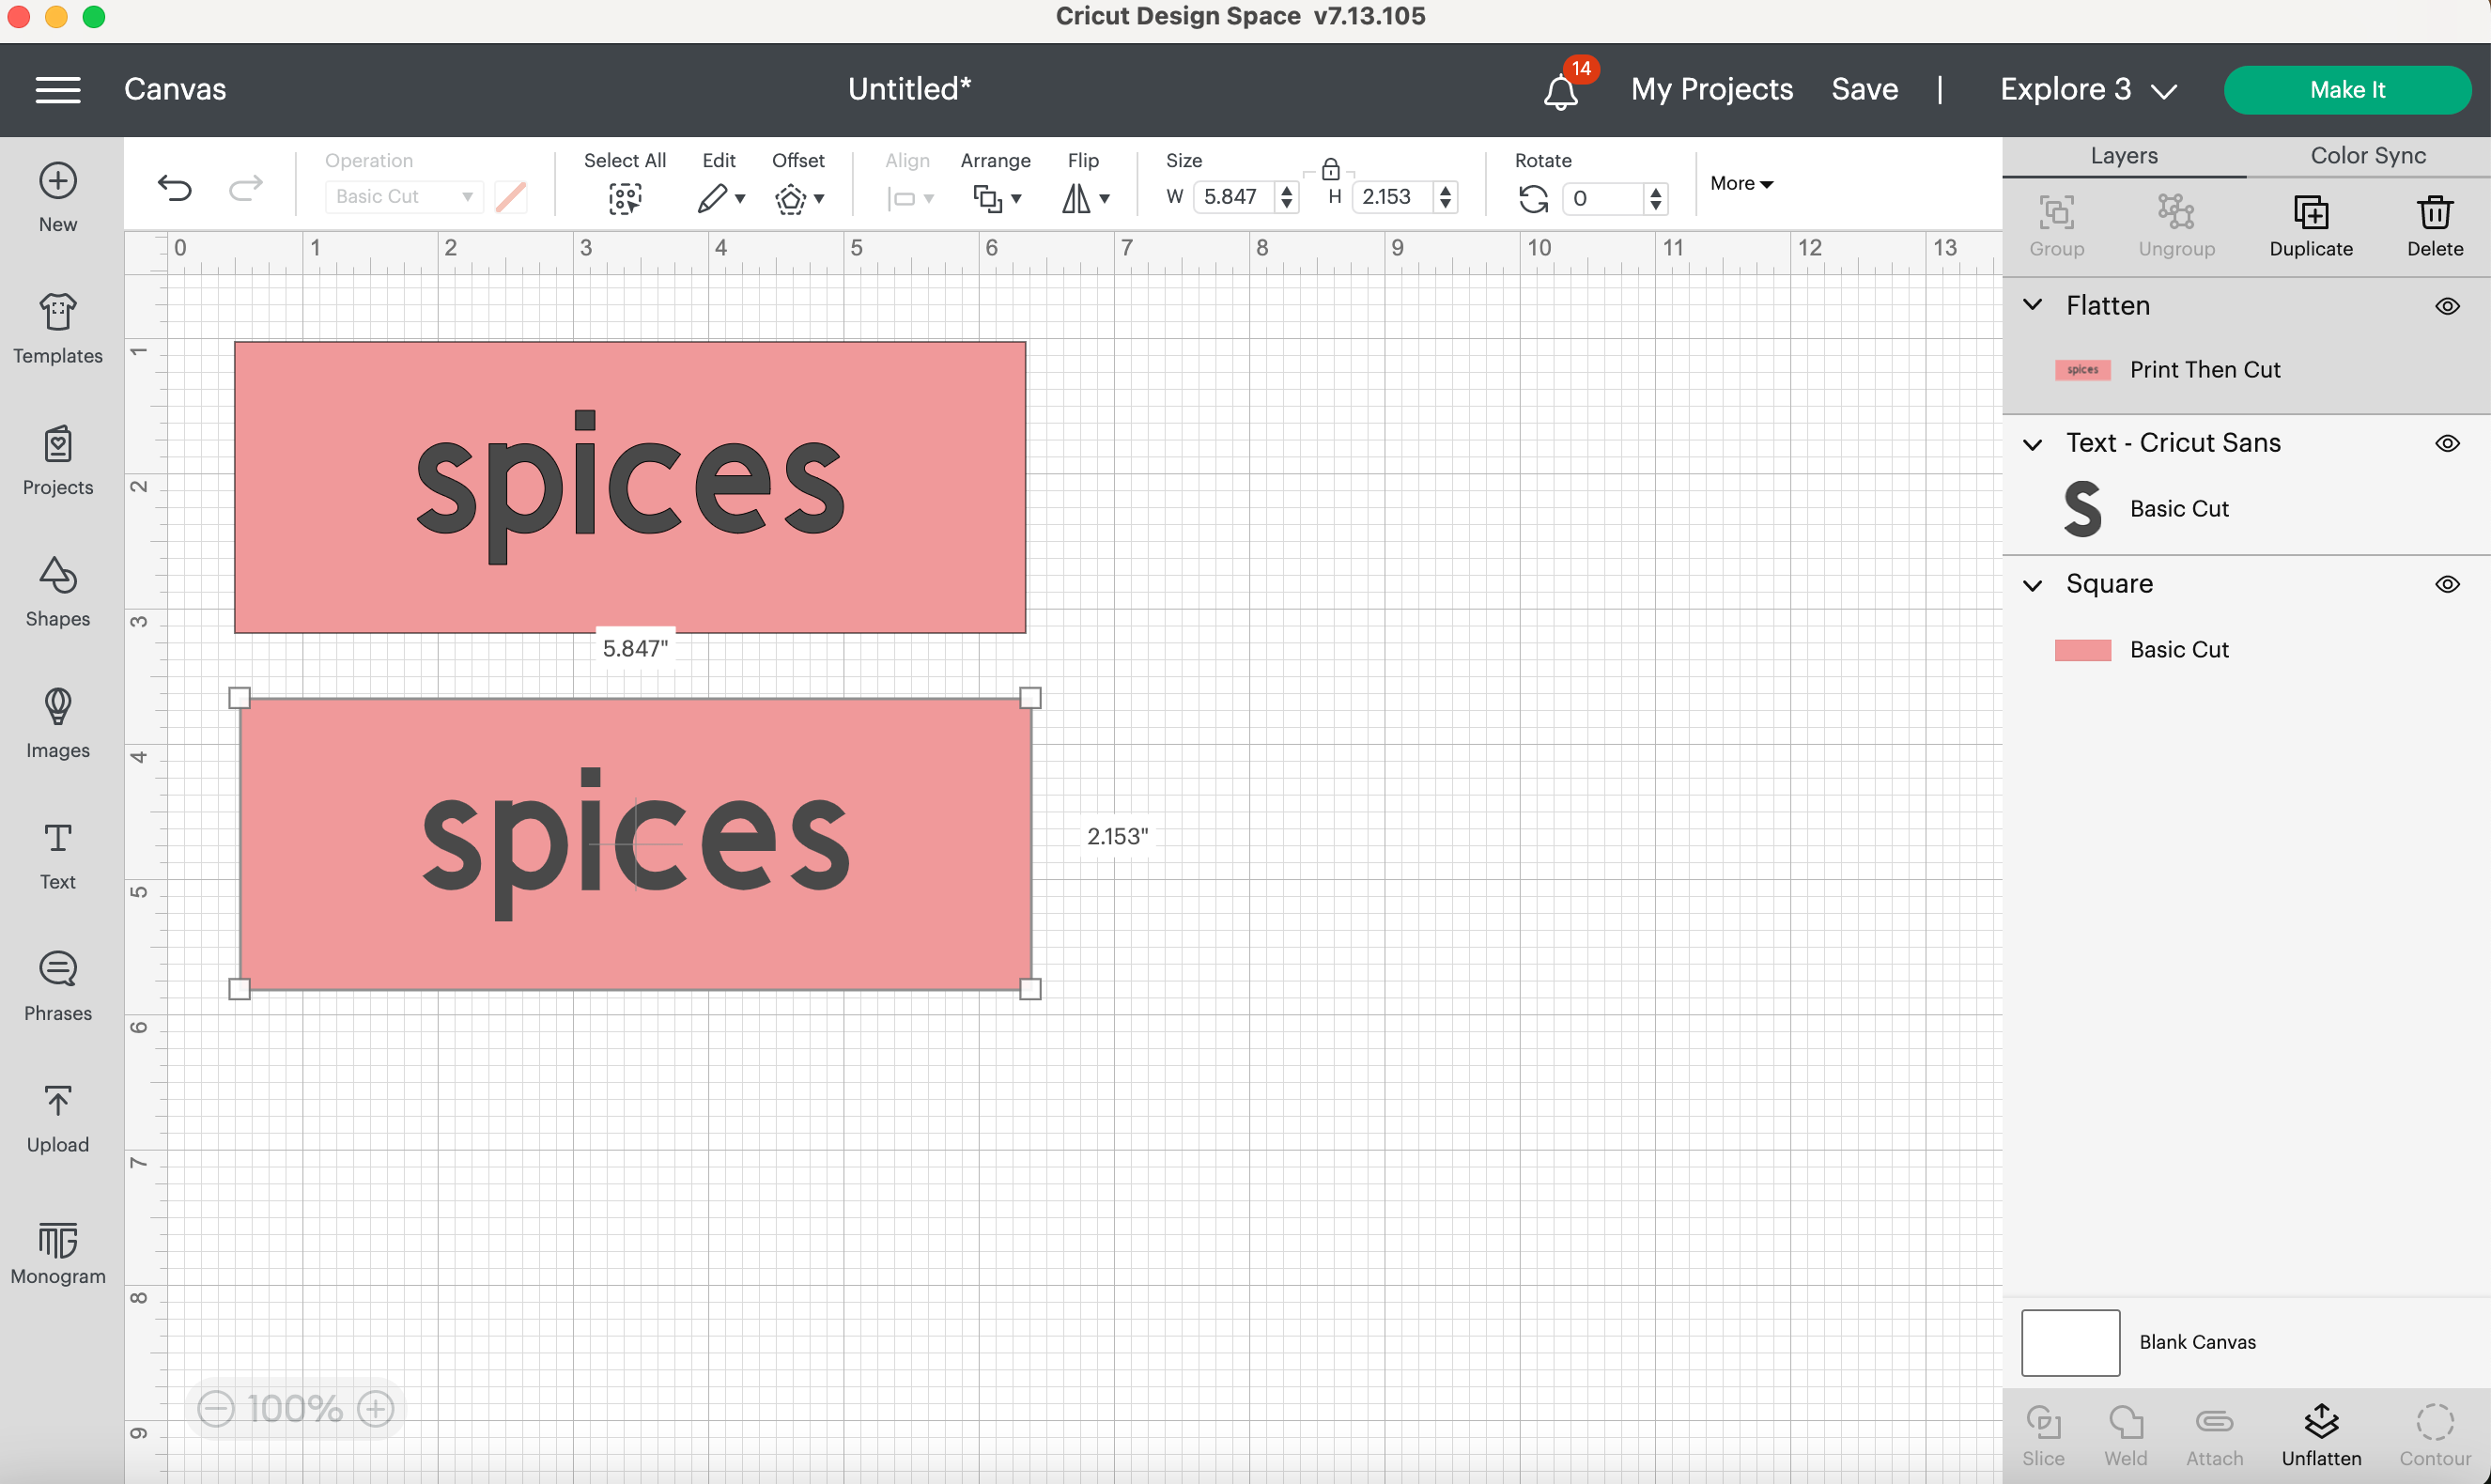
It's also great for creating Print Then Cut labels. Adding text to a shape and then flattening the layers will allow you to print out the label and your Cricut will cut around the outside of the label.
Do I Need to Flatten on Cricut?
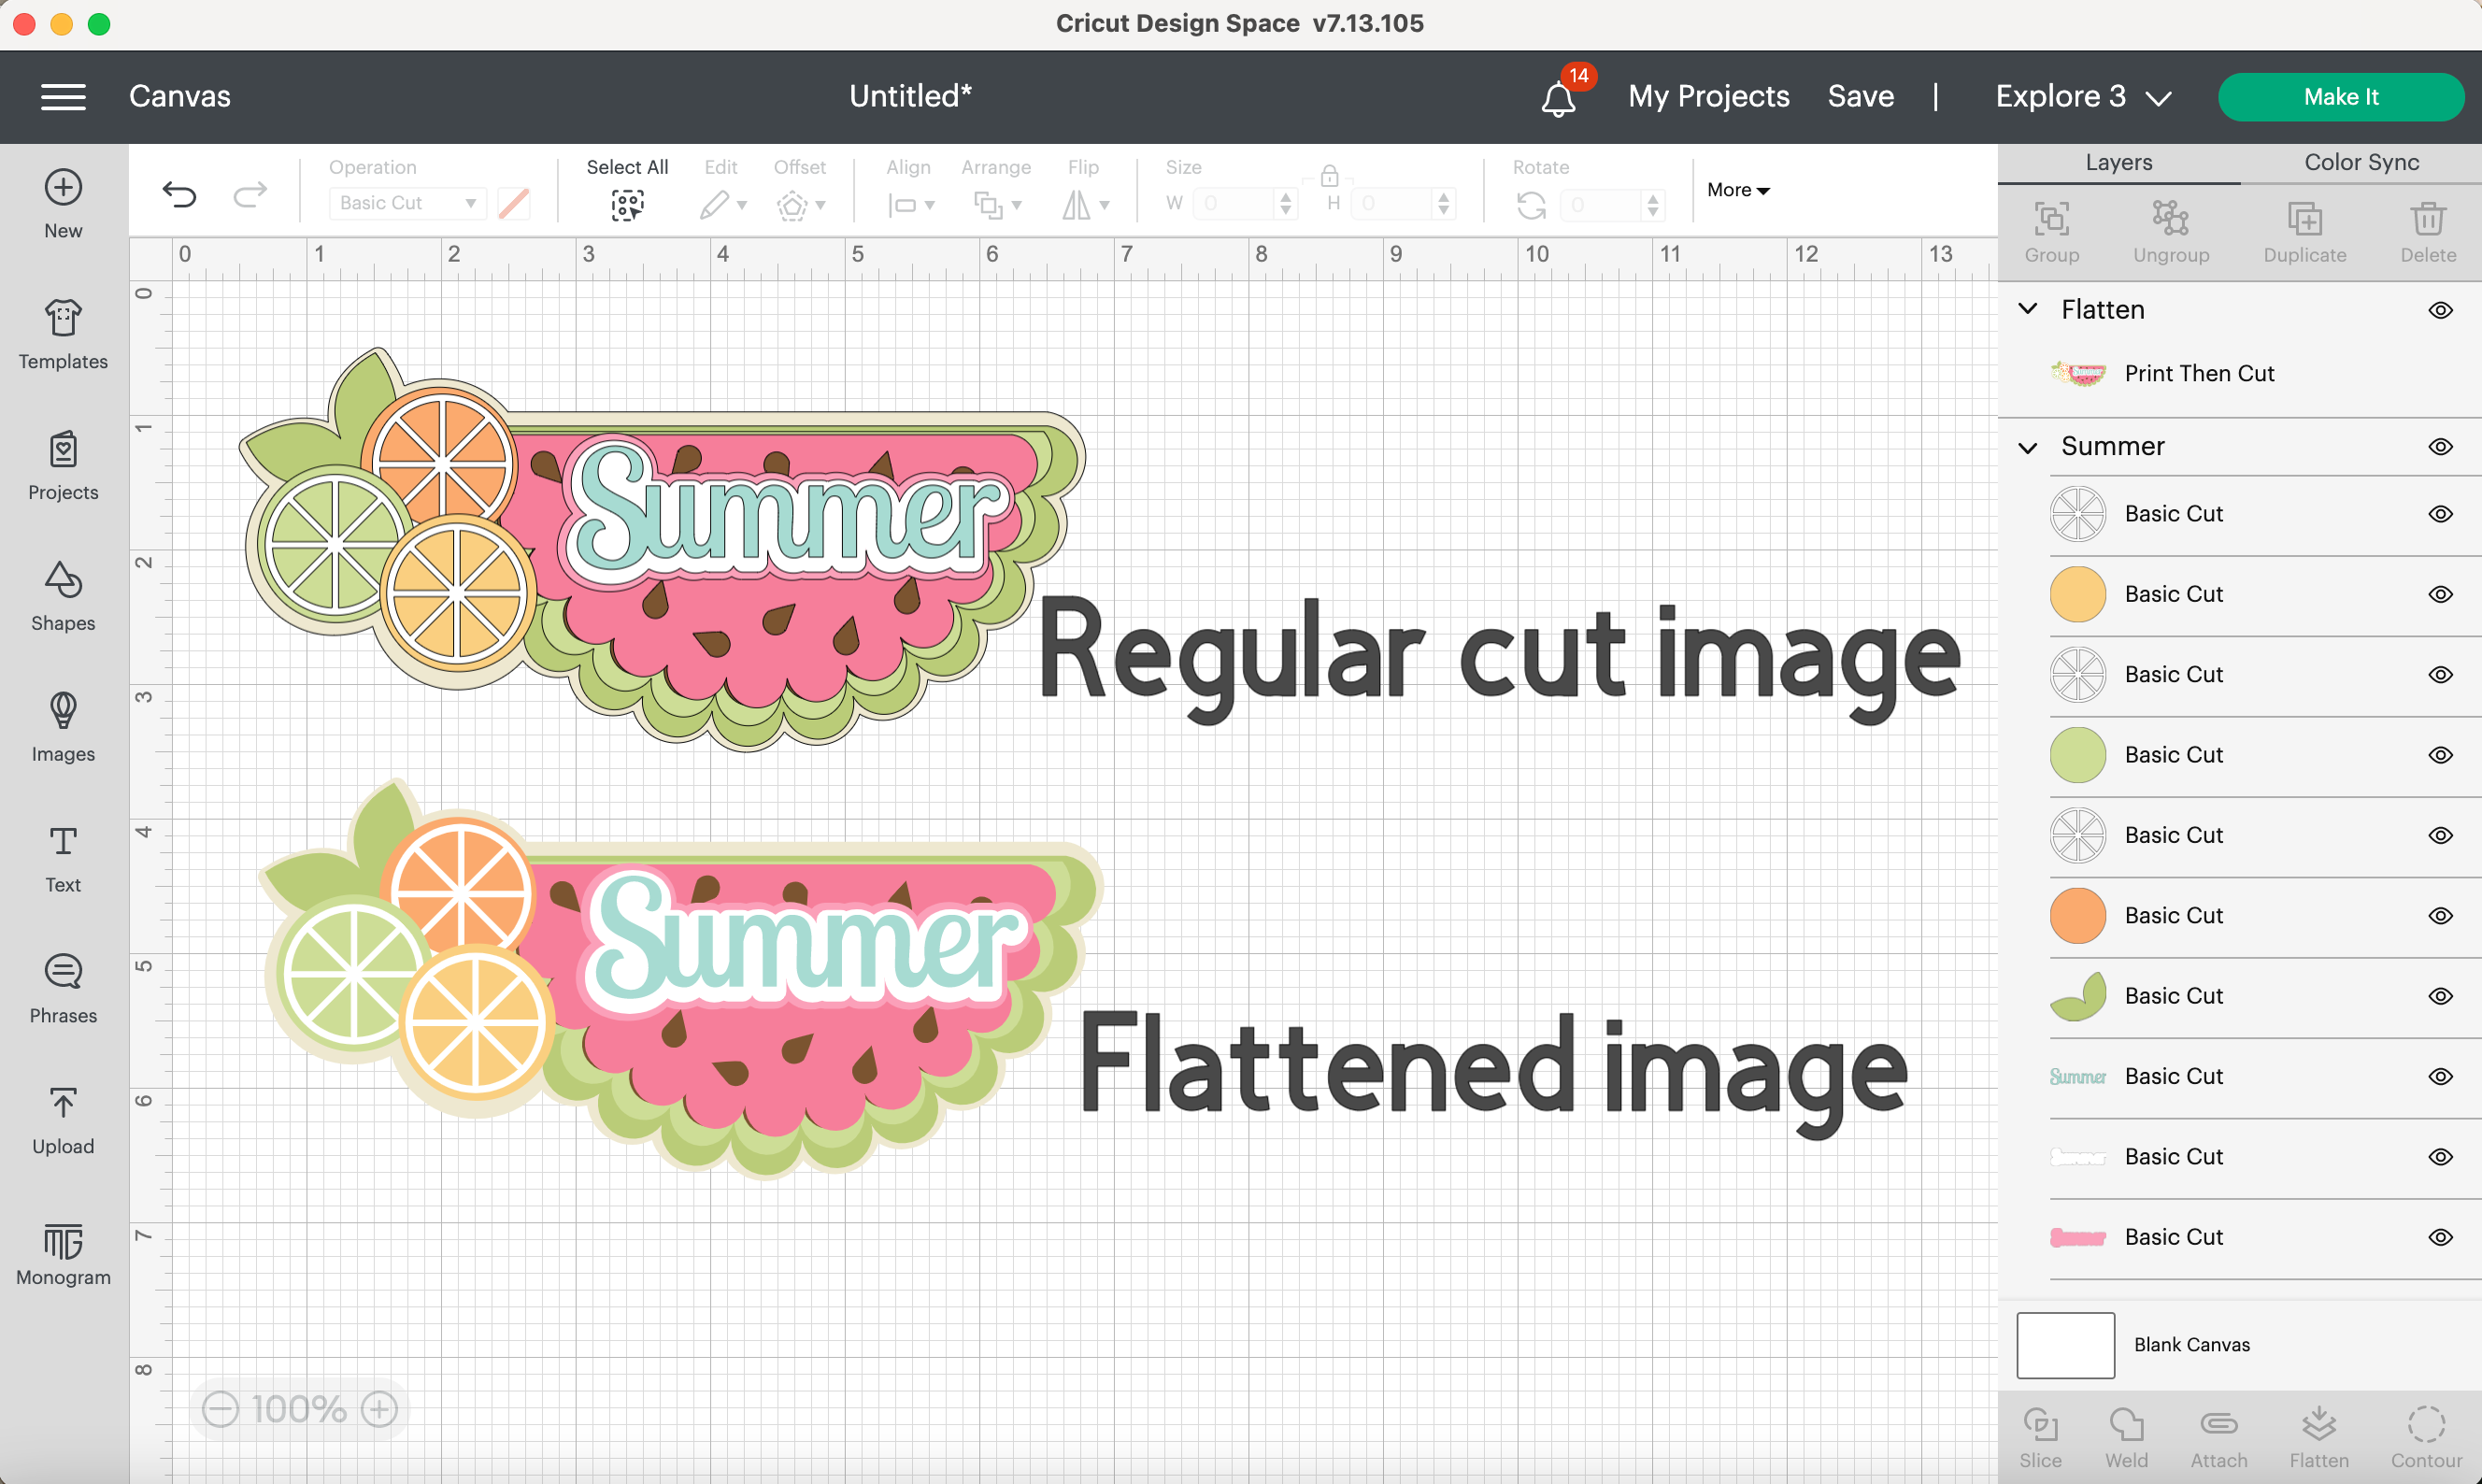
You do not need to flatten your image for regular layered cut projects. When you want each layer/color cut from a different material or different color you wouldn't flatten the image.
When you're creating a Print-Then-Cut project like stickers or scrapbook layouts you will want to select all the layers for each image and then flatten them. This will turn your image into one single layer and allow your Cricut to cut around the outside of each printed image.
Can I Unflatten an Image?
Yes! You can Unflatten images in Design Space. Unflattening is as simple as clicking the Unflatten button.
You won't see an “Unflatten” button until you have flattened an image on your canvas. The “Flatten” button at the bottom of the Layers panel, becomes the “Unflatten” button when an image has been flattened.
Simply click the Unflatten button and your image will return to a multi-layer image.
It will not be exactly what it was before. If you want to make all the layers cut layers again you will need to select each layer and change the operation type back to “Basic Cut”.
What Items Can Be Flattened?
You can Flatten any object in Design Space. Text, Shapes, and images from the Design Space library or images you upload into Design Space.
Just remember, you have to have 2 or more layers selected before you can flatten the image.
Why Do You Need to Use Flatten for Print Projects?
When your image is a cut layer Design Space doesn't know to send it to the printer.
Before you can print your image Design Space needs to recognize it as a print image.
Most images in Design Space are cut layers. That means in order to get multiple colors on one project you have to cut out multiple colors of your material and layer them.
When you use the Flatten Tool, Design Space combines all the layers you've selected into a single printable image.
Using the Flatten tool tells Design Space you need to print the image and just cut around the outside of the whole image with no cuts inside.
How Do I Flatten One Layer?
Let's say you want to Print Then Cut a lot of single-layer images. Maybe it's a bunch of circles or something like a single-layer jack-o-lantern.
As of the writing of this post, if you have only one layer selected the Flatten tool is greyed out and cannot be clicked on.
To turn that single layer into a printable image you'll need to head up to the top toolbar. Click the dropdown arrow under Operation (it will likely say “Basic Cut”) and scroll down to the second to last option “Print Then Cut”.
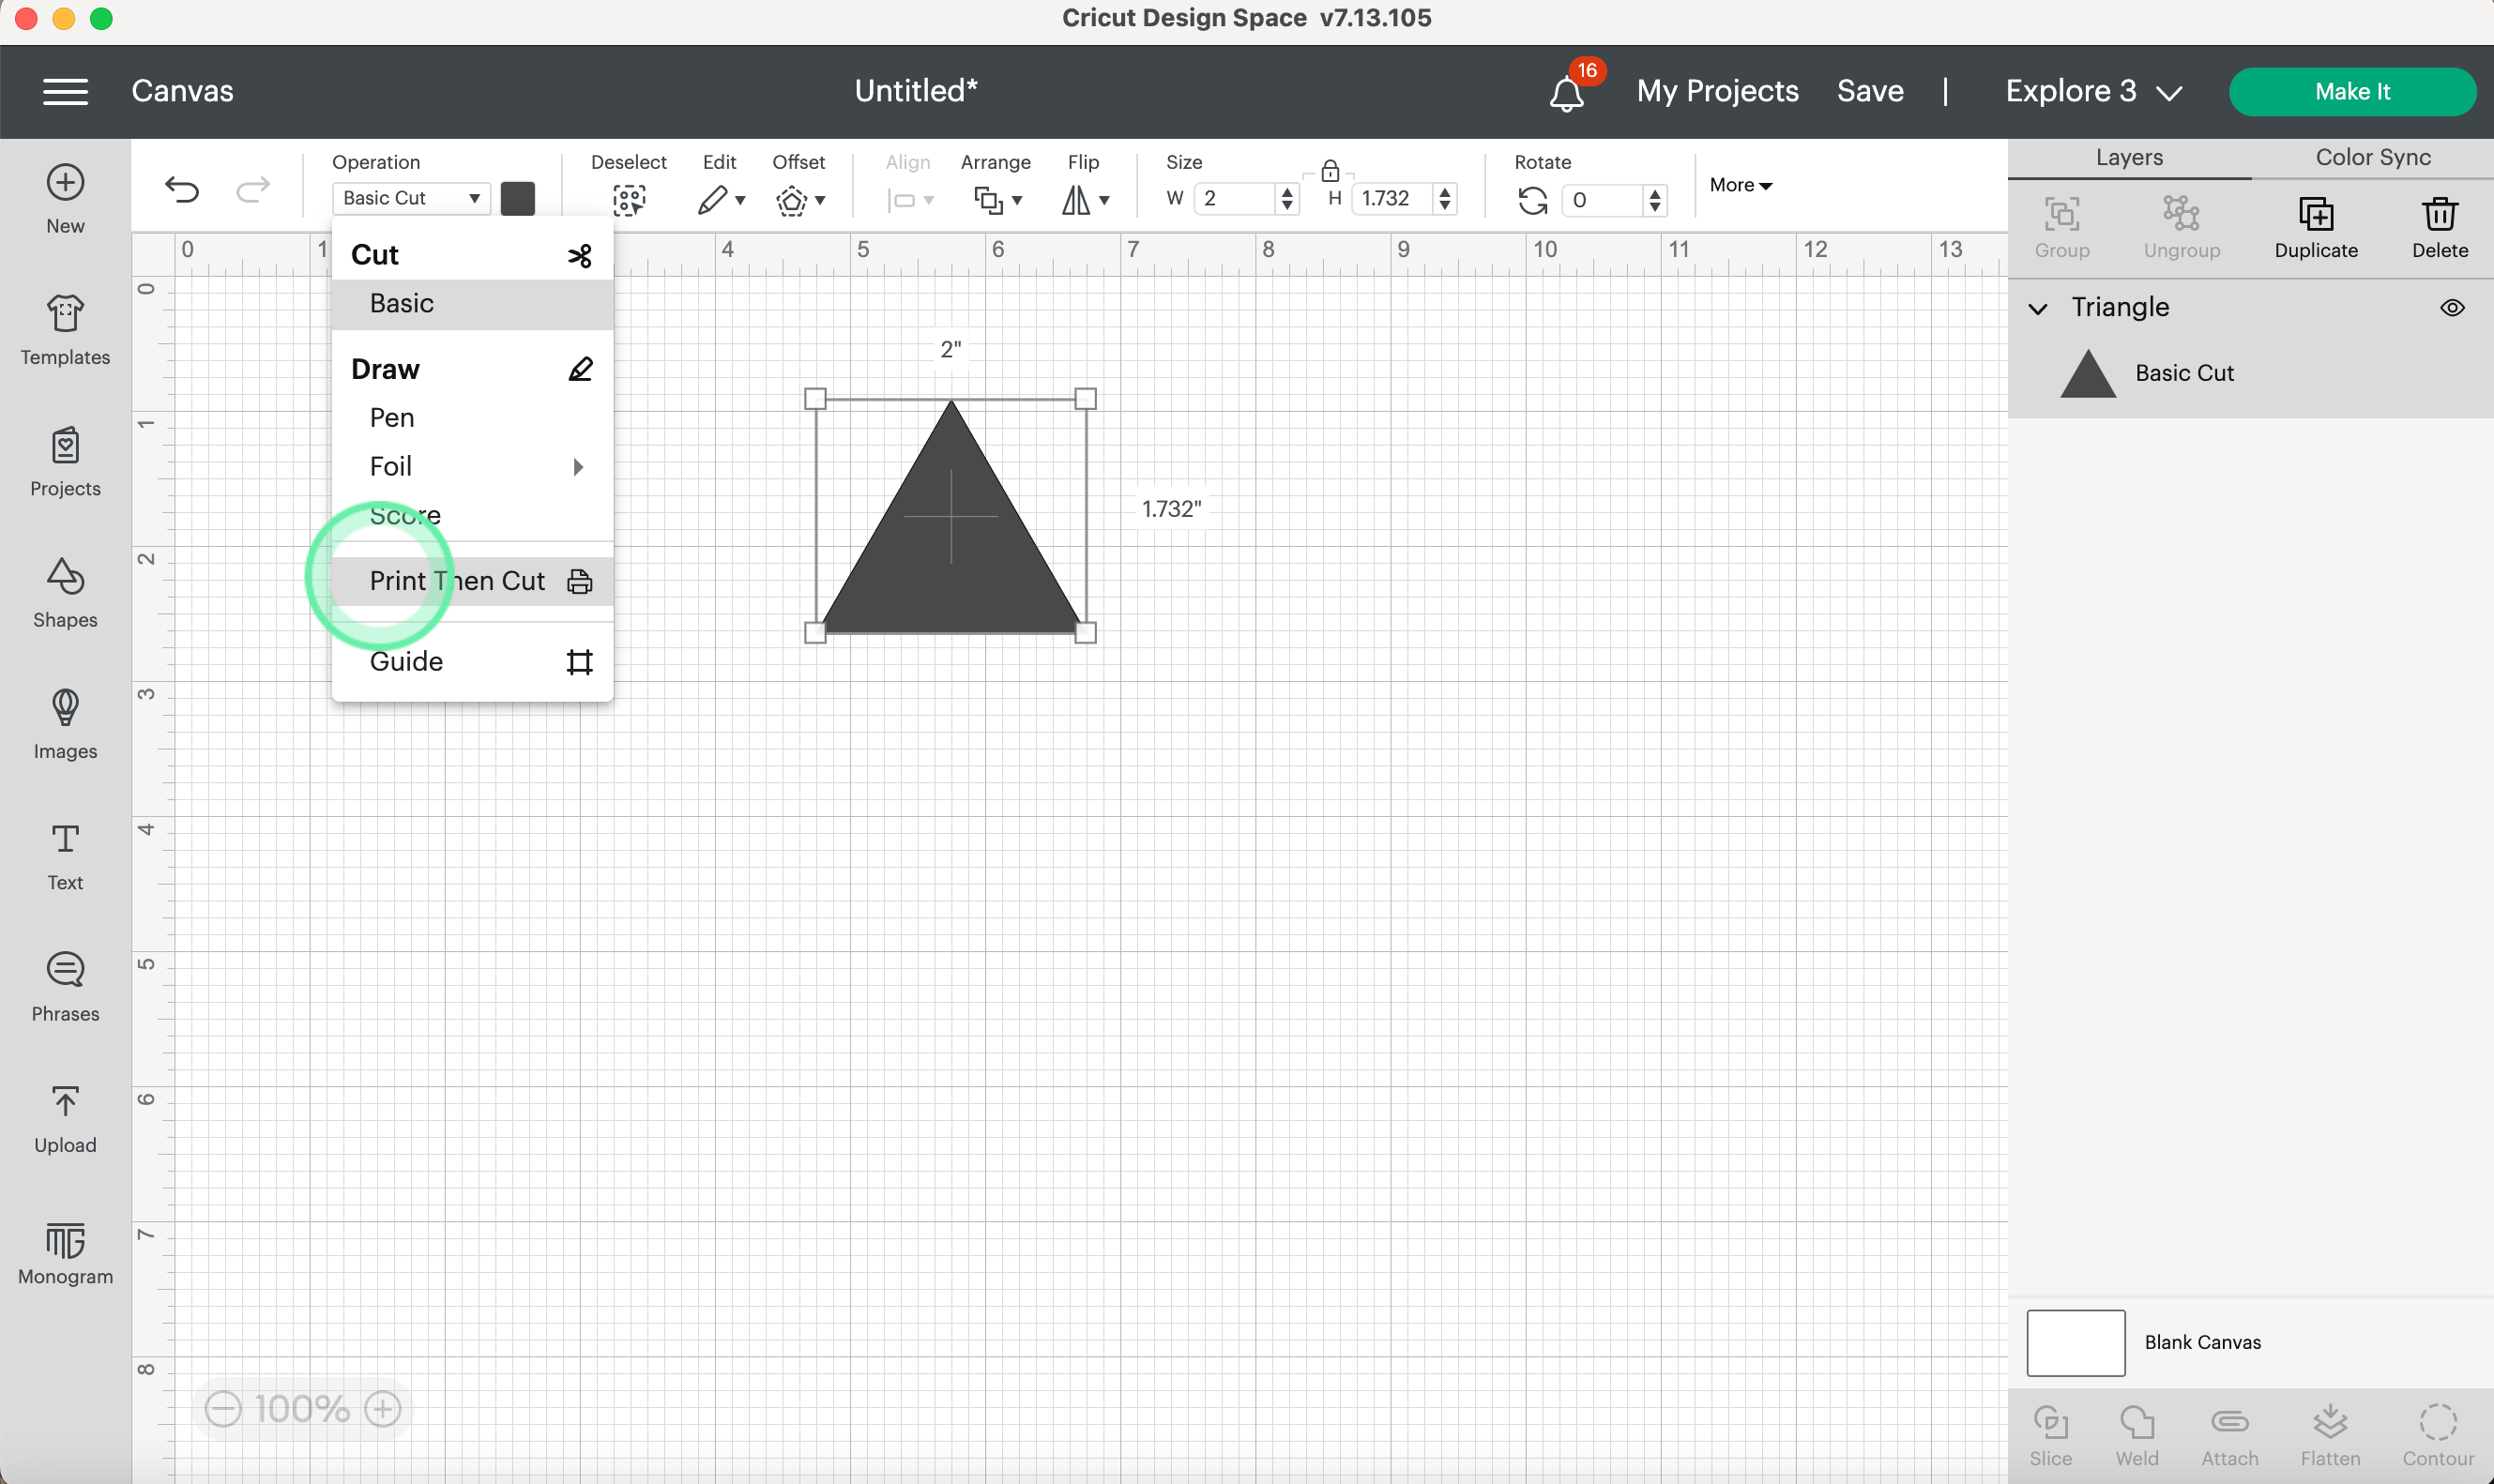
Click on that and now you have a printable single-layer object.
Frequently Asked What Does Flatten Mean On Cricut Questions
Flatten can be a little confusing. I'm going to answer the most often asked “What Does Flatten Mean on Cricut” questions that I've heard.
Why am I Seeing Cut Lines Inside My Flattened Image?
I've mentioned above that, when you change a cut image to a Print Then Cut image Design Space tells your machine to cut around the exterior of the image.
This is true when you have a solid layer at the base of your image. If there are areas that are open from the top layer to the bottom layer Design Space will see those as a cut area.
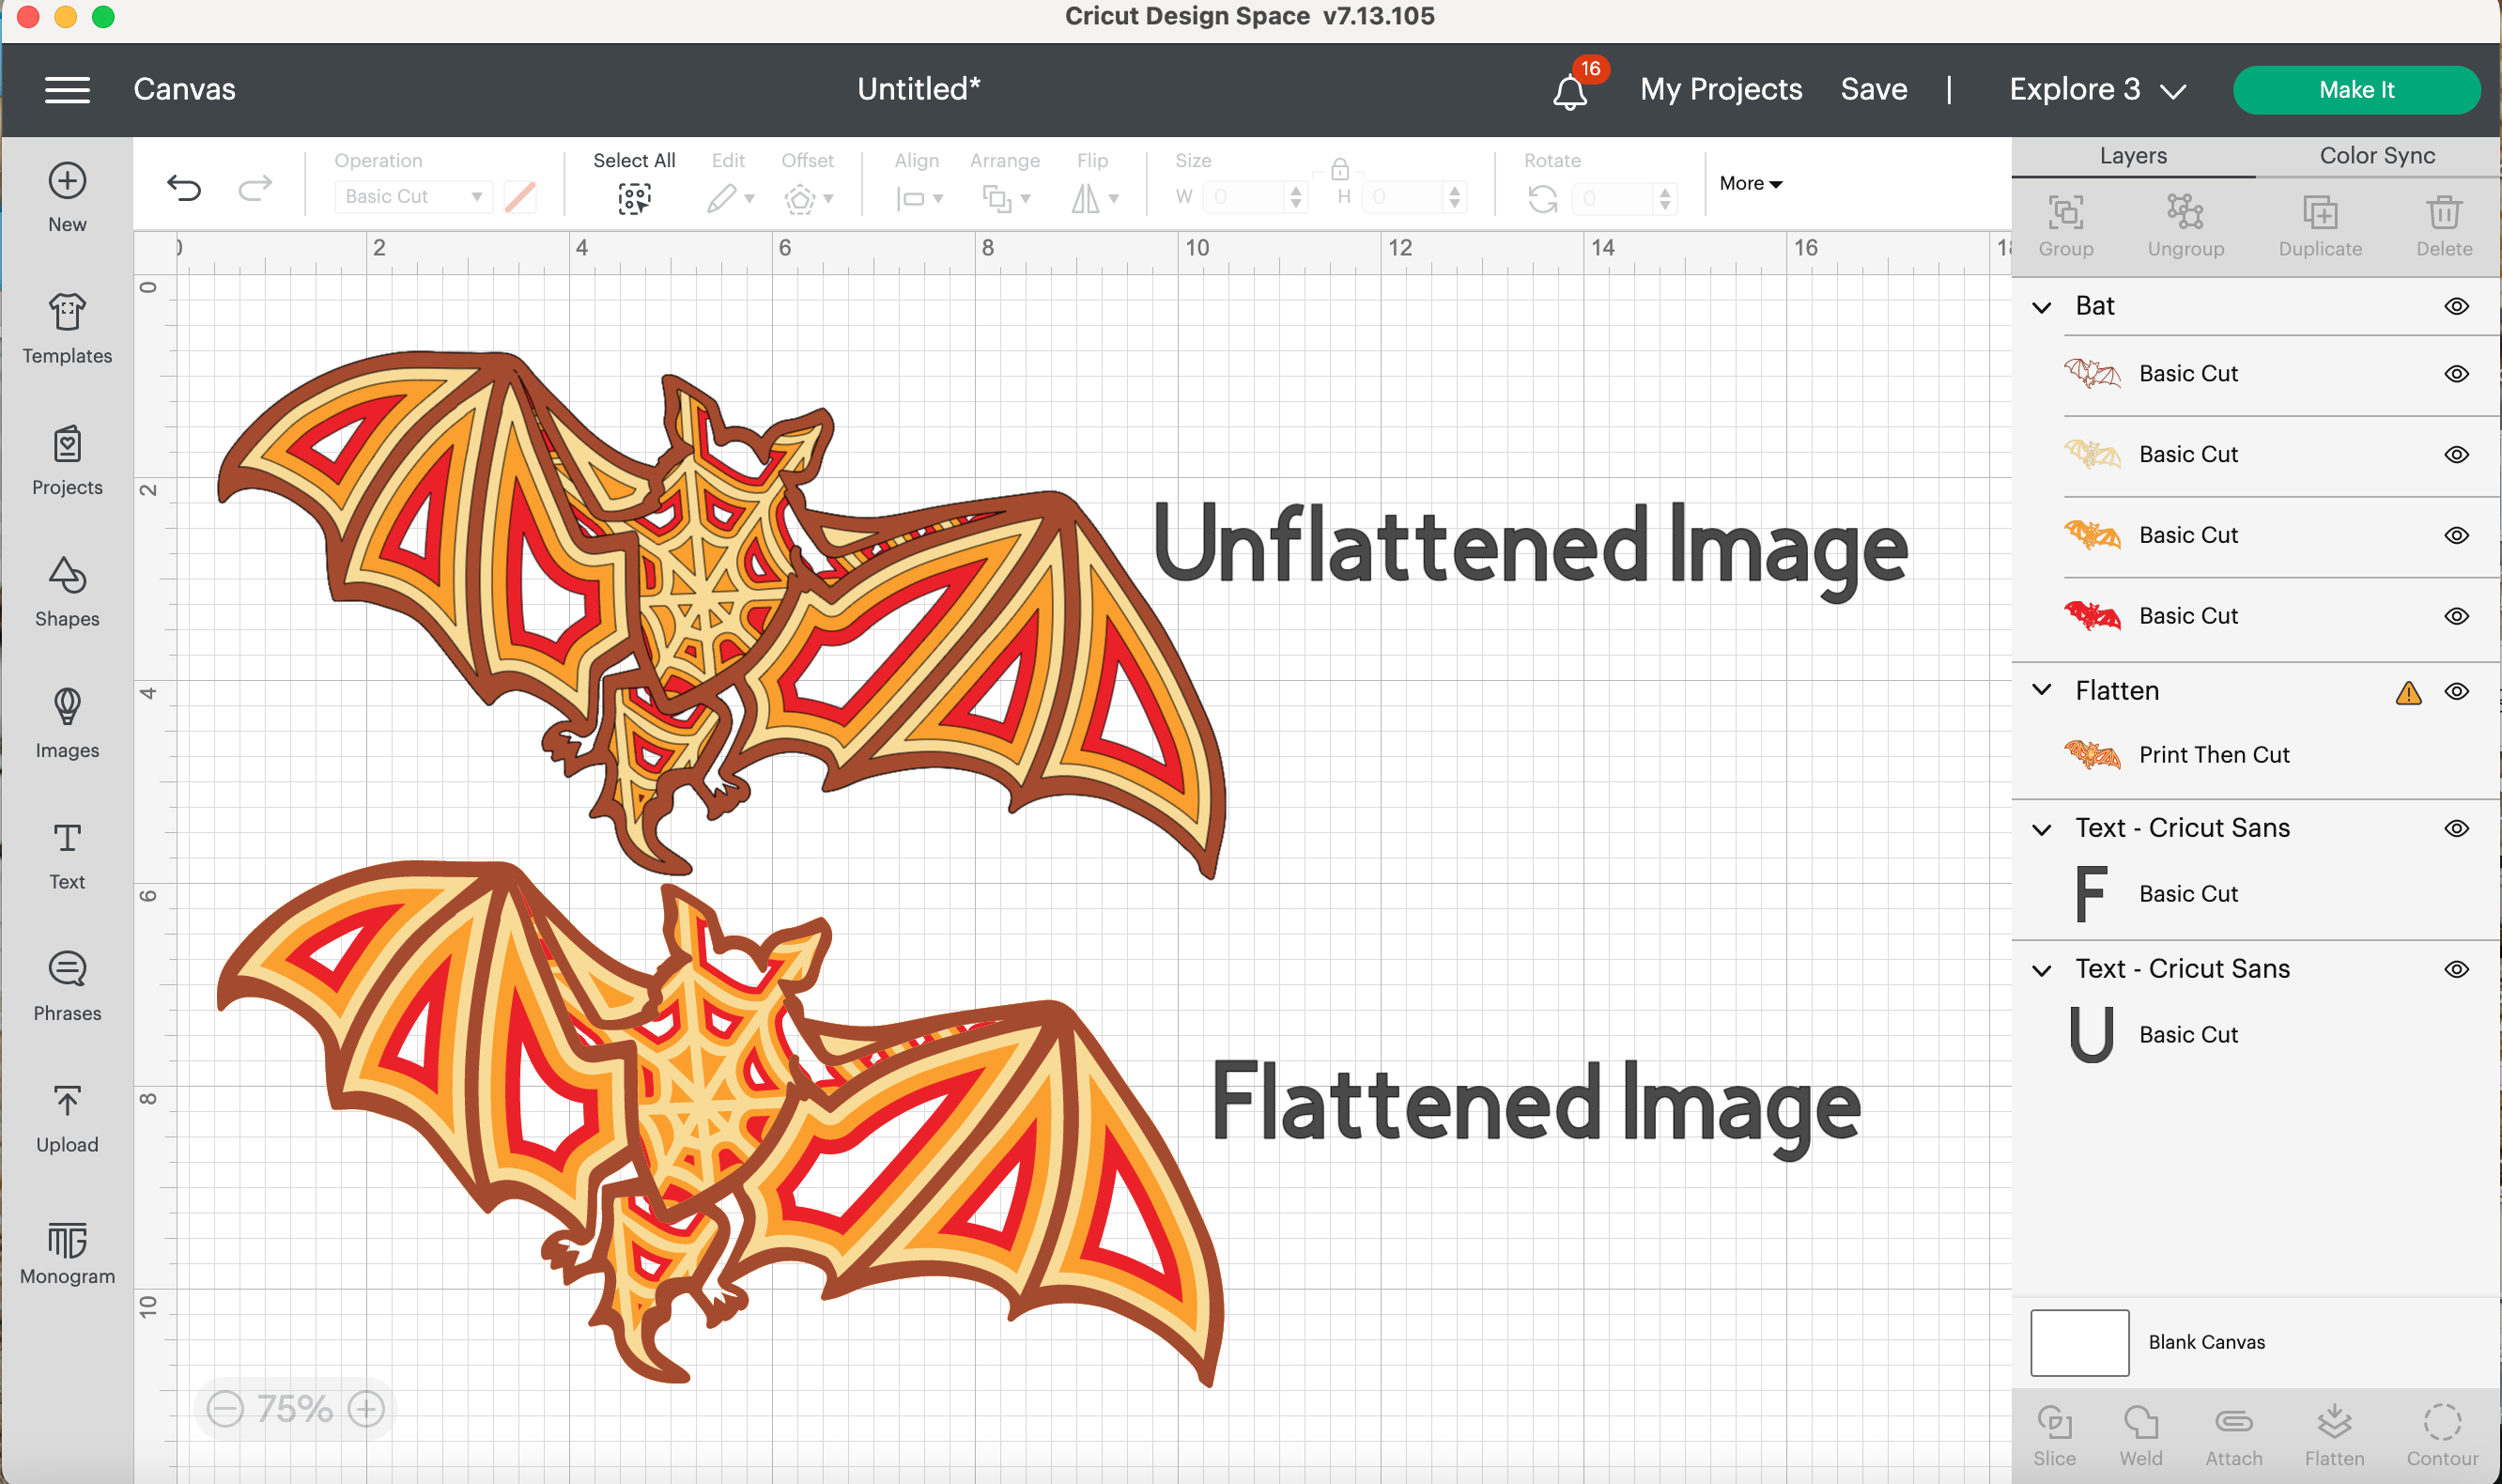
In the photo above you can see both the Unflattened image and Flattened image have areas inside the bat where you can see the canvas grid show through. These areas will cut and end up an open spot on the image.
How Do I Get Rid of Open Areas?
Thanks to the Offset tool in Design Space getting rid of any inside cut lines is easy. Simply select all your layers and then
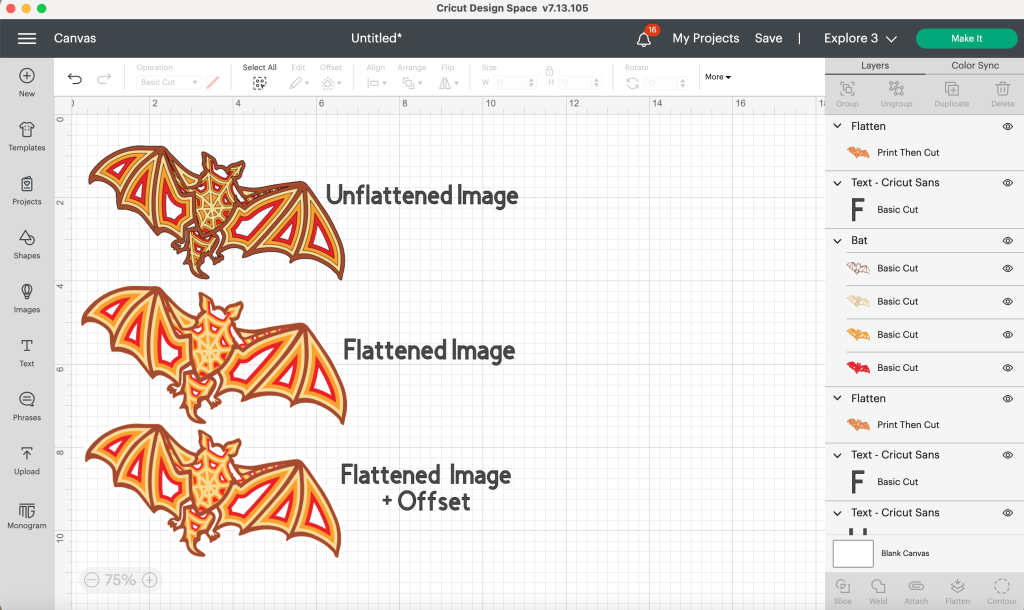
In the upper toolbar select “Offset” and use the slider to decide how wide you want your offset to be. Once you have it how you want. Select all the layers and click “Flatten” and now you have an image that will be printed and then cut out on only the outside of the image.
Why is the Flatten Button Greyed Out?
If the Flatten button isn't working or is greyed out that means you don't have visible layers selected. Check your Layers panel to make sure you've selected an image and have more than one layer selected.
Where is the Unflatten Button?
The Unflatten button shows up when you have a flattened layer selected. Check your layers panel and make sure you've clicked on the Flattened layer. Once the Flattened layer is selected you should seen the Unflatten button show up.
What Does Weld and Flatten Mean on Cricut?
Weld and Flatten are similar but very different. While they both do basically the same thing, the end result is different.
When you select multiple layers and Weld them together you're creating a single cut image. You'll see all the images turn one single color and be a cut file.
When you select multiple layers and Flatten them you're creating a single Print Then Cut image. You'll see slight differences from the original but the multiple colors will remain and you'll now have an image that Design Space will send to your printer before telling your Cricut machine to cut it.
Final Thoughts on Using the Flatten Tool in Design Space
The Flatten Tool in Design Space is a tool you really need to get to know if you want to create Print Then Cut projects. Flatten is relatively easy to use once you understand the steps for using it.
I really like adding an Offset layer to the back, turning it white, and making it slightly larger than the image. This allows your Cricut machine to have a little bit of a buffer when cutting. I really like having a slight border around my images, especially stickers.
I hope this answered your questions about the Flatten tool in Design Space. If you have any additional questions leave them in the comments and we'll answer them for you.
For more Cricut help check out our YouTube Channel here.
You can also join our Cricut Facebook group here and/or follow us on Instagram here.
- Bringing Home Baby Chicks - March 11, 2025
- Is RootsTech for Moms? - February 23, 2024
- How to Get Oil Stains Out of Clothes - May 5, 2023