This post may contain affiliate links. If you purchase something through any link, we may receive a small commission at no extra charge to you. Supplies used may be given to us free of charge, all projects and opinions are my own.
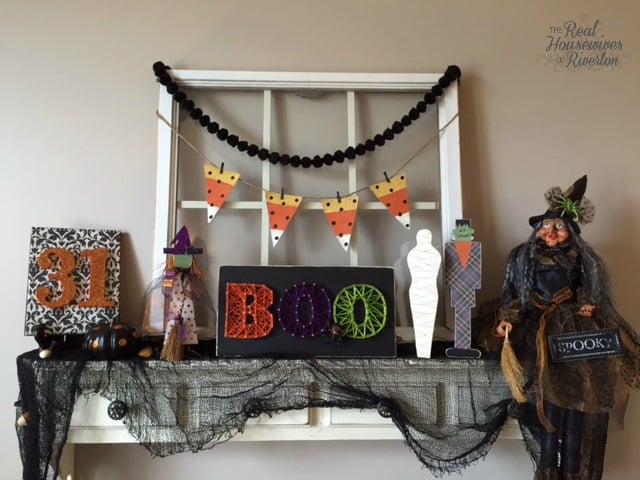
Halloween is one of my very favorite holidays. This year I knew I wanted something fun to sit on my shelf and I am so happy with how my Halloween String Art turned out.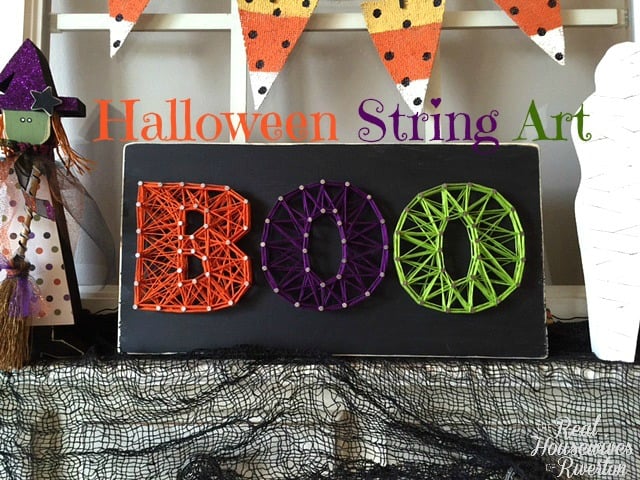
Are you ready for Halloween?
We are getting so excited for Halloween. We've pulled out our decorations and are putting the finishing touches on how everything is set up.
We've almost figured out everyone's costumes and my husband is having a lot of fun getting the yard ready for trick or treaters.
What is string art?
I remember doing string art when I was a little girl in elementary school. We called it yarn art because we used yarn. It looked a little different but it's still pretty much the same concept.
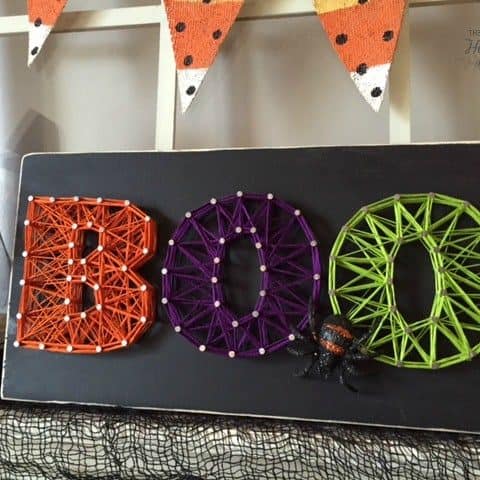
String art is using string (I'm using embroidery floss) to wrap around nails to create an image. The nails are nailed into a board outlining the image, you can do almost any image you can think of.
This boo string art is a project I've been wanting to tackle for a while now. I'm pretty much obsessed with decorating for Halloween and one more decoration wasn't going to hurt anyone.
You can never have too many Halloween decorations…right?
How do I make Halloween String Art?
To make your own Halloween string art you're going to need to collect your supplies and set aside a little time. Creating string art isn't hard but depending on what you're making it can take some time.
We used letters printed from the computer laid out on a board and hammered nails around each letter to create our image. You can use a cutting machine or printer for your stencil.
What do I need to make string art?
- Board (ours is 7″x 14″)
- Black paint & paint brush
- Image + scissors (or cutting machine)
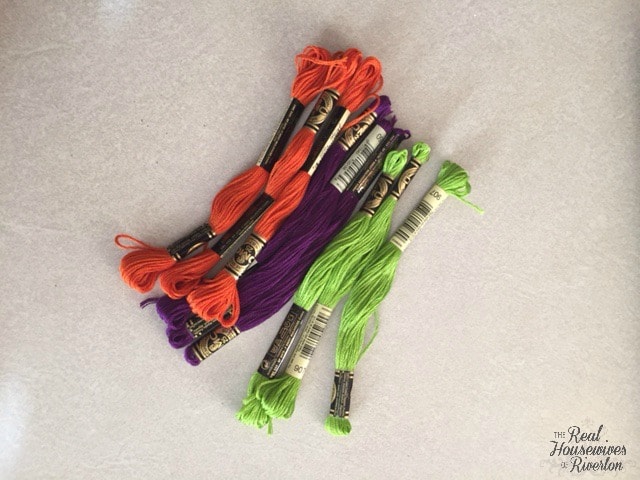
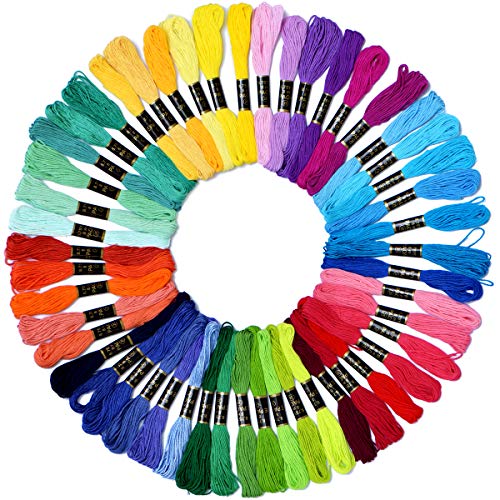
- Embroidery floss (we used orange, purple, and green – 2-3 of each color)
- Nails (with a head, approximately 1″ long)
- Hammer
Let's make string art!
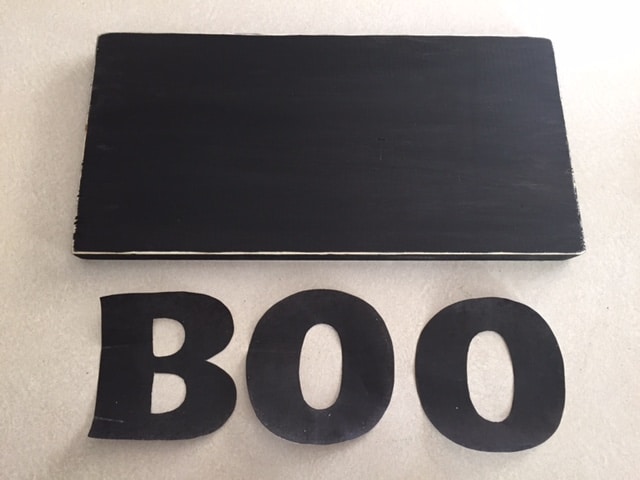
Paint your piece of wood. I painted my board black and sanded the edges.
Next, you will print out the letters choosing the font you would like to use and the size of the letters. My letters measure 4 inches.
Then cut out your letters this will be used as your pattern (you could also use your Cricut machine to cut the letters out for you).
Trace the letters onto the wood with a pencil. Make sure the letters are spaced out evenly. This is when a tape measure comes in handy.
You could also print out your letters and then lay the paper out on the board and nail around them instead of cutting out each letter.
Just make sure your letters are spaced how you want them to be on the board.
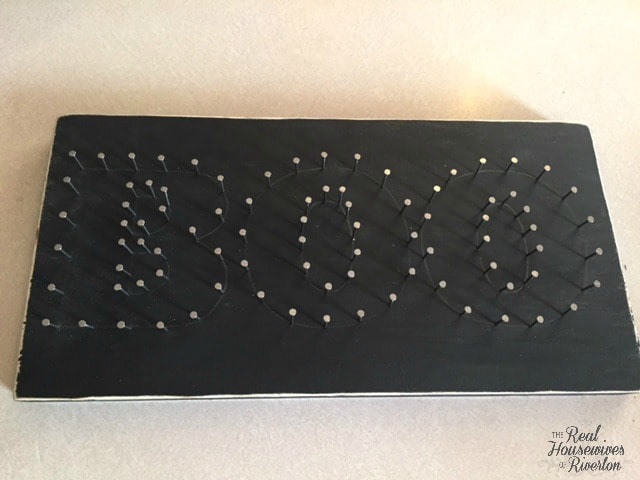
It's hammer time! I started at the top of the letter and spaced my nails out evenly while following the lines.
You can space them out as close or far apart as you want. I hammered the nails 1/2 way into the wood.
When you are all finished make sure all the nails are secure in the wood.
Let's get stringing.
These are the colors of embroidery floss I used. I chose these colors because they remind me of Halloween!
You can have a lot of fun picking out floss because there are so many colors out there to choose from. This is great because not everyone uses the same colors for their seasonal decor.
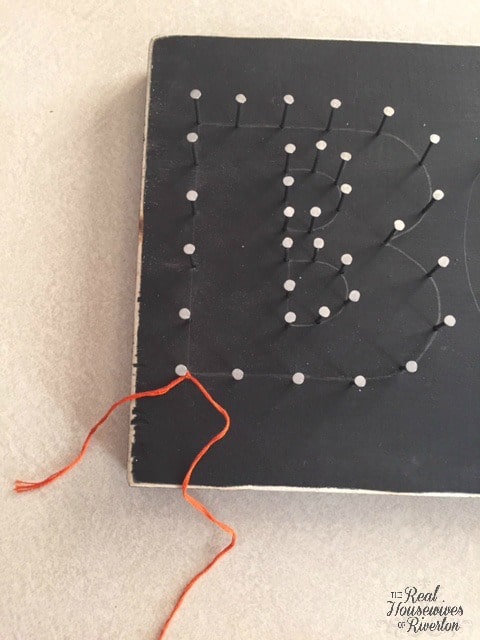
Time to start stringing!! I tied my floss around the first nail to keep it secure and started stringing and worked my way from nail to nail around the letters.
My only advice for this part is to push your string down on the nail as you go. That is what is fun about this Halloween string art, you can't really mess up!
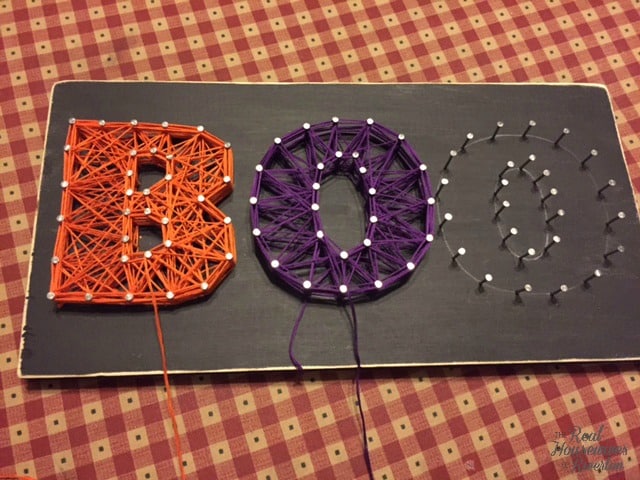
Remember when we warned you that this might take a little while. Find a comfy chair and catch up on your T.V. shows and string until your fingers are sore!
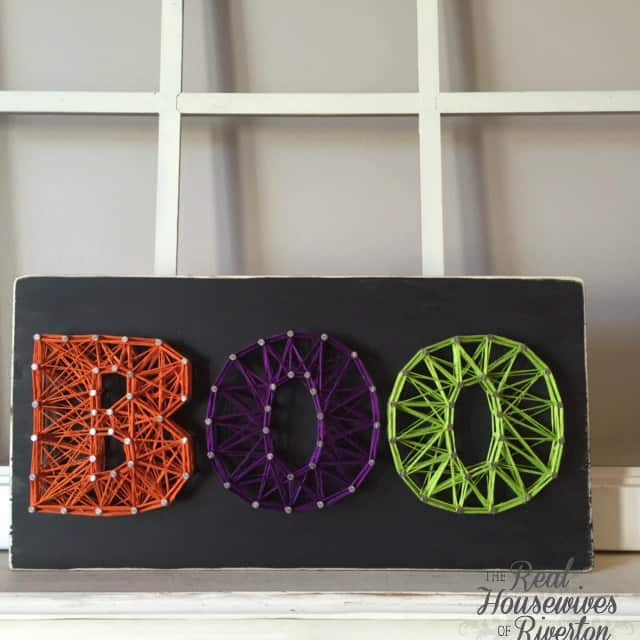
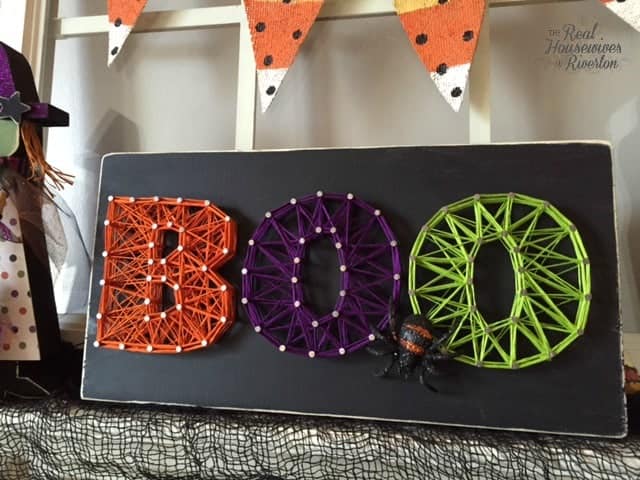
Here she is – BOO Halloween String Art all finished!!!

My kids were having fun going through my Halloween stuff and they found this cute little spider and they decided the Halloween string art needed a spider on it. I thought it looked cute!
I really thought this Halloween string art would be a lot harder than it was. That is one of the reasons I was putting off trying it, but it was actually really fun and relaxing once I got the hang of it.
I'm already thinking of different designs I can make for the different holidays coming up!
Boo Halloween String Art
Dress up your shelf with your own Boo Halloween String Art.
Materials
- 1 Board (ours is 7" tall, 14" long, and 1" thick)
- Black Paint
- Stain (optional for edges)
- Nails (about 1" with a head)
- Embroidery Floss (2-3 per color, per letter)
- Image (print or cut out with cutting machine)
Tools
- Hammer
- Paint brush
- Sandpaper
Instructions
- Gather supplies.
- Sand board smooth (if needed).
- Paint board.
- If desired sand edges.
- If desired stain sanded edges.
- Apply image to board. You can print out an image and tape it to the board and nail around each letter and then remove. You can also use a cutting machine to cut the letters out and nail around the edges.
- Start at the top of each letter and space nails out evenly around the edges. You can choose how close or far apart you want them. Hammer them in about 1/2 way.
- Tie your embroidery floss around one nail and start stringing. Work your way from nail to nail pushing the floss down the nail as you go. You can choose to zigzag back and forth or just go from nail to nail.
- Repeat step 8 for each letter.
- Sit back and enjoy your sign.
Notes
Once you've made your first string art the possibilities are endless for future projects. You're going to be addicted. We warned you! 🙂
Recommended Products
As an Amazon Associate and member of other affiliate programs, I earn from qualifying purchases.
-
 24PCS Sand Paper Variety Pack Sandpaper 12 Grits Assorted for Wood Metal Sanding, Wet Dry Sandpaper 120/150/180/240/320/400/600/800/1000/1500/2500/3000 Grit
 -
 US Art Supply 1 inch Foam Sponge Wood Handle Paint Brush Set (Super Value Pack of 50) - Lightweight, Durable and Great for Acrylics, Stains, Varnishes, Crafts, Art
 -
 Apple Barrel Gloss Acrylic Paint in Assorted Colors (2-Ounce), 20662 Black
 -
 Cricut Maker, Champagne
 -
 Embroidery Floss Rainbow Color 50 Skeins Per Pack Cross Stitch Threads Friendship Bracelets Floss Crafts Floss
Happy Stringing!

If you enjoyed our Halloween String Art tutorial make sure you check out these other tutorials:
Burlap Candy Corn Banner
- The Best Vinegar Paint Brush Cleaner Method - May 6, 2023
- 10 Fun and Easy St. Patrick's Day Games - March 1, 2023
- Valentine's Day Felt Wreath DIY - January 20, 2023

I’ve seen the string art before and it looks so complicated and difficult but your tutorial Angela looks awesome and something I could definitely do! May have to give this one a try!
Isn’t it so cute? I am really wishing I could convince her to give it to me! ~Jenn
[…] craft you can make while in the comforts of your air conditioned home. Back in October I made a “Boo” string art piece that I loved. I really enjoyed making it and at the time I told myself I was going […]
I’m trying this~ What size board and nails did you use? Did it take to the packs of the floss for each letter? Thanks!
The board measures 7″ tall and 14″ long. 2-3 things of floss were used for each letter and the nails are just a skinny nail that had a head on it big enough to keep the string below it. Thanks so much for stopping by and hope if you make it you’ll share your finished product with us!
[…] Full tutorial: housewivesofriverton.com […]
[…] If you like this fun Wooden Candy Corn Craft, check out these other great Halloween Craft Posts! Halloween BOO String Art Custom Halloween Boys Shirt « Riverton Housewives Round Up # 83Riverton Housewives Round […]
[…] Step 1: find your image. This image is found in Cricut Design Space, it is a Make it Now project which means you pretty much have to do nothing to create the project. To find the file when you’re in Design Space scroll down on that home screen and under “What’s New for Cricut Access” click view all. This file is free if you’re a Cricut Access member, if you aren’t you can purchase the file individually. Once you click view all you’re looking for the file titled One-Cut Halloween Gallery Art. For me it was the 2nd image, in the future you may need to use the search tool and look for it that way (it is linked directly above also). Once you click on the file you’ll want to select customize at the bottom. We’re not just selecting make it because this project actually includes 3 different cut files, the bat, a pumpkin, and a tombstone. Also, you may need to resize the image depending on the size of the shirt you’re putting it on. To make sure you’re only cutting the image you want on the right side layers bar you can click the eyeball and hide both the pumpkin and tombstone. For this shirt, I resized the image to be 9″ wide then clicked make it. The next screen will vary depending on if you’re using the Maker machine or an Explore machine. The new Maker doesn’t have the smart dial that the Explore family of machines has. Instead, if you’re using the Maker you will choose your material from the Design Space program itself. Regardless of which machine you’re using you want to make sure you have 1. mirrored your image and 2. that you have selected iron-on as the material you’re cutting. Once you have selected your material, Design Space will then prompt you to load your mat (remember to place your iron-on shiny side down). Once the mat is loaded you will push the “C” button and let the machine do all the hard work. Unlike the Explore machines, the Maker has a new adaptive tool system. This still allows us the use of the fine point blade and deep cut blade like we use in the Explore machines but it also allows us to use the new rotary blade and the knife blade. That’s why the housing for the blades looks a little different than it does in the Explore machines. For this project, since I’m cutting iron-on, I used the fine point blade. Once the machine is finished cutting it will prompt you to unload the mat. After you have unloaded the mat peel off your iron-on and trim off the excess (I like to keep the whole piece of iron-on (or vinyl) on the mat while it’s cutting to save as much as I can when it comes to trimming after the cut is made). I thought I had a photo of the iron-on before I weeded it but it’s been lost in the abyss of my phone apparently. So you just get to see it all weeded. I used the BrightPad and weeding tool to do the weeding and it was awesome. I love that it helps show all the cut lines so you can really see if you’ve missed weeding a piece. Let’s just take a minute and check out how intricate these cuts are! When I look at the little tiny pieces of the candy, that teeny tiny circle right above the vampire lips, and the small spikes/legs whatever they are on the worm I am so impressed that the cuts are so sharp and clean. The next step is actually applying our image to the shirt. Step 1 of this step is to have a nice solid surface, the EasyPress Mat on that solid surface, and your EasyPress preheated (this takes just seconds). There are many reasons I recommend Cricut iron-on, 1. I’ve had amazing success with it even with just using my iron. 2. There are a ton of colors of Cricut iron-on which I love, and 3. When using the Cricut EasyPress and Cricut iron-on the EasyPress instruction booklet gives you the exact temperature and time required to get a perfect result. For a cotton shirt with regular iron-on my settings are temperature: 305 time: 30 seconds. The EasyPress surface is 9″x 9″ so my image is just small enough to fit (if your image is larger than 9×9 you would just do one section and then lift and do another section following the recommendations for your fabric/iron-on). I did a quick preheat of my fabric (that is on top of the EasyPress Mat on top of the solid surface) and then centered my image on the shirt and then pressed the image on. (side note – the BrightPad is currently my favorite babysitter. Little Miss Lila gets so excited every time she sees it that she’ll sit for crazy long amounts of time tracing anything she can get her hands on…today she was kept busy tracing coloring book pages while I finished my project WIN/WIN!!!) After pressing the front I flipped the shirt over and pressed it from the back as well. This helps ensure a strong bond between the fabric and iron-on. Once that was done I peeled off the protective plastic and perfection! (seriously check out how thin those spider legs are and how tiny the rat’s teeth are…it really is perfection!) So there you have it a cool Bat Halloween shirt that makes both 11-year-old boys and their moms happy! There obviously needs to be more projects just like this in the world. You should make sure and comment and let Bright know just how cool he (and his shirt) are, he would love it! And, if you’re looking for another cool Halloween shirt design I created this creepy spider shirt a few (four…has it really been four??) years ago using my Expression machine, Cricut iron-on, and an iron. Bright and Morgan had these shirts for a few years and they’re still my favorite. Sadly Bright outgrew his but luckily Morgan is right there happily wearing it this year too! I used the Maker machine for this project. I have been blown away by the Maker, I have owned the Explore, Explore Air, and Explore Air 2 (along with the earlier machine the Expression) and the ease of using the Maker is second to none. Add how easy it is to use with the new features (HELLO ROTARY BLADE and adaptive tool system) and you’ve literally got a dream cutting machine right in your home. We can’t wait to show you some of the amazing things this machine can do, the number one is the fact that it can now cut unbacked (unbonded) fabric!! The project opportunities were pretty much endless before, now there is nothing this machine can’t do! Did you like this Bat Halloween Shirt? If you do check out our other fun Halloween projects: Halloween String Art […]