This post may contain affiliate links. If you purchase something through any link, we may receive a small commission at no extra charge to you. Supplies used may be given to us free of charge, all projects and opinions are my own.
The littlest Princess is OBSESSED with Mermaids. It’s quite funny since she still doesn’t talk much but she can say Mermaid just fine. I have had this adorable mermaid fabric for years now and she saw it and fell in love. I decided to whip her up a quick dress and am loving how it turned out.
I did it maxi dress length. I went back and fourth on if I liked it or not that long but once it was done it looked really cute on her.
You might recognize the top of the dress. Do you remember this outfit from last year?
I used the same T-shirt for both outfits. The 1st outfit used the bottom of the shirt and this time I used the top and the sleeves.
The dress was quite simple to make. I just started with the t-shirt top and then measured the overall length I wanted the dress to be. I used the full width of the mermaid fabric cut to the length I wanted. I used my surger along all 4 sides and then turned it into a tube. I then gathered the top of the tube so it would fit inside the bottom of the t-shirt. (There are multiple ways to gather fabric, I just used a long straight stitch without back stitching at the beginning or end and pulled the bobbin thread to gather it. There are many tutorials out there but if you need more information don’t hesitate to ask, I’ll gladly help.)
I then used my surger to attach the skirt to the top. It gives a little stretch to the seam which is nice. I also added a ruffle to the bottom (followed the same steps for making the mermaid tube).
This is what it looked like at that point.
Holding her beloved Ariel.
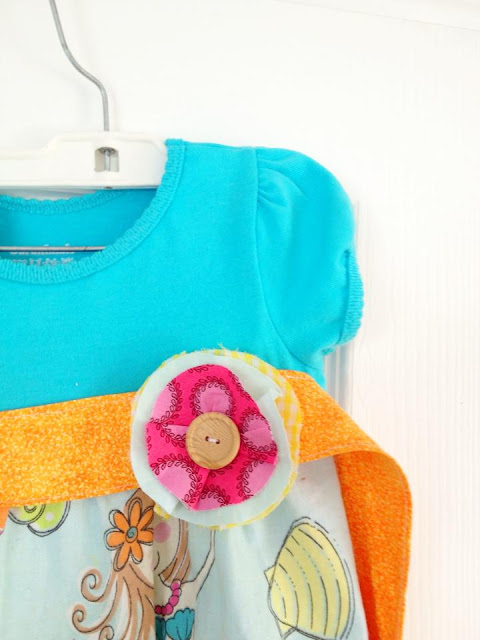
I knew it still needed something, I was going trying to decide what and my sweet friends told me to use an orange ribbon or make an orange sash for where the shirt and skirt connect. I came home and got right to work (yay for having orange on hand).
Here is how it looked at that point.
Looking pretty cute and I was loving it and THEN the mail came…
I was lucky enough to win this gorgeous dress from Momi Boutique last week and it came in the mail just in time.
I love the flower on the sash so I added one final touch. A Momi inspired flower.
Now I really feel like it’s done and the little Goose couldn’t be more excited about her new dress. You know it’s approved when they’re actually hugging their clothes right?!
One last picture of the whole dress. This is after she wore it for quite a while so it’s already in the wash.
I know these aren’t the world’s greatest instructions so if you have any questions please don’t hesitate to ask, I’d love to help however I can. I am never sure how much instruction is needed and there are quite a few t-shirt dress tutorials floating around out there so I don’t want to be repetitive.
Have a GREAT weekend and be sure to come back tomorrow because I’ll have a REAL tutorial for you then!!!
I’m working hard to have little one’s entire spring/summer wardrobe made by me ready by the time we need it!
© The REAL Housewives of Riverton, 2011-2012. Unauthorized use and/or duplication of this material without express and written permission from this blog’s authors and/or owners is strictly prohibited. Excerpts and links may be used, provided that full and clear credit is given to The REAL Housewives of Riverton with appropriate and specific direction to the original content.
Latest posts by Creative Housewives (see all)
- The Best Vinegar Paint Brush Cleaner Method - May 6, 2023
- 10 Fun and Easy St. Patrick’s Day Games - March 1, 2023
- Valentine’s Day Felt Wreath DIY - January 20, 2023


So cute! I love it!
Thanks Amber.