This post may contain affiliate links. If you purchase something through any link, we may receive a small commission at no extra charge to you. Supplies used may be given to us free of charge, all projects and opinions are my own.
I have to admit, I was pretty excited for Card Swap starting up again. Since we had the last one in early November it seems like forever since we’ve all been together. Because of the break I was excited to do something new. I can’t wait to show you the whole project tomorrow but for now I want to show you part of the “card” I did.
Thanks to Gena helping me figure out that there was a strawberry shaped box on the Spring Cottage cartridge, using my Cricut Cutting machine I was all set for what I wanted to do. I was using the Cricut file in Craft Room so there was very little instruction on how to put the strawberry together. I did a search to see if anyone else had made a post showing how to put it together but I couldn’t find anything. I found a few finished projects but nothing showing how to put the strawberry together, so I decided I would do a tutorial on how I did it. I can’t guarantee that this is the correct way but it’s how I did it and they turned out pretty cute I think.
The first step, of course is to decide on your size and cut it out. I cut mine at about 3.5″ x 5″.
There are wonderful scoring marks (that you can’t see in this picture) that make it very easy to fold the strawberry without having to score it first.
Here it is with the fold made but not yet put together.
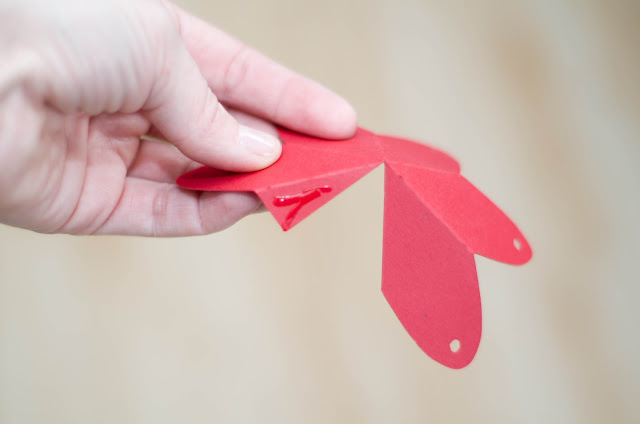
There is one section (seen below) that folds to the inside of the box.
You want to put glue (I used hot glue, you can use any type of adhesive but since I was doing 60 of them hot glue was the way for me to go.) on this flap and then fold the box together with that on the inside.
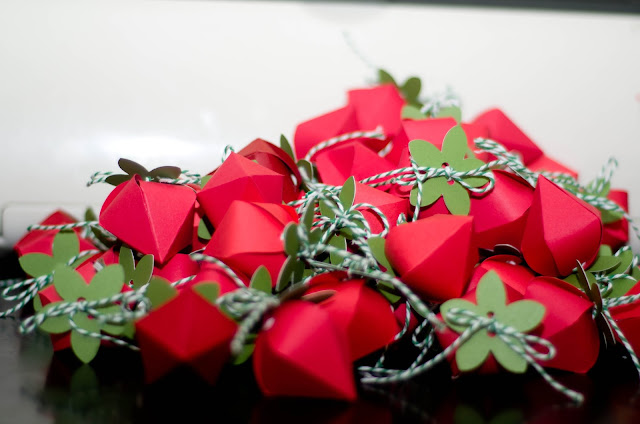
Here is a whole bunch of the ones I did.
Now you need something to tie it up. I’m using this cute bakers twine. This was the part I was most unsure about how to do. I wasn’t sure the best way to run the string through the holes to get the box to close up the best way. I found that running the string from the front to the back and then bringing it to the front of the next “petal” and running it through to the back and keep going all the way around.
Then, gently tighten the string up. I just tied it once to keep it from loosening.
Since I was not filling these but wanted the others in card swap to be able to if they wanted to I closed them up in a way that makes them easy to open again and add little treats.
I forgot to get a picture of the stem before I put it on but it is a cute flower looking piece with 2 holes in it. I ran both ends of the twine through the holes and then tied it into a bow.
I like the way they came together.
I did a whole bunch of them (60!) on a rather small scale. I am excited to make them again in a bigger size, I think they would be fun to put treats in for the kids.
Come back tomorrow to see how I used them for my cards this month!
© The REAL Housewives of Riverton, 2011-2012. Unauthorized use and/or duplication of this material without express and written permission from this blog’s authors and/or owners is strictly prohibited. Excerpts and links may be used, provided that full and clear credit is given to The REAL Housewives of Riverton with appropriate and specific direction to the original content.
Latest posts by Creative Housewives (see all)
- The Best Vinegar Paint Brush Cleaner Method - May 6, 2023
- 10 Fun and Easy St. Patrick’s Day Games - March 1, 2023
- Valentine’s Day Felt Wreath DIY - January 20, 2023





So cute!
Thank you April. Aren’t they fun.
ooh, they are so cute.
I want some as well. (:
This is incredibly cute!
Thanks for sharing
Thank you!!
thank you 🙂 They were so fun to make!
Hi, Thought you might like to know that one of your tutorials as been plagiarised (http://craftstutorials.com/paper-strawberry-box-cricut-spring-cottage-cartridge/) as mine was (http://www.nexttonicx.com/blog/?p=5497).
I’m seriously unimpressed, it looks as though they’ve copied all of their content from other blogs. So far every post I’ve googled belongs to someone else!
Thank you Nicola. I am not sure what to do. I tried to reply to the post asking them to take it down and you can’t comment to their blog, they have no way to contact them and there is no facebook page or anything. I am so frustrated.
~Jenn
Plagiarism makes me cranky (I’m a teacher…). Here’s what I found:
https://www.facebook.com/pages/Crafts-Tutorials/329319813832587?sk=info
Basic info
Created 2012
Contact info
Email [email protected]
Website http://www.craftstutorials.com
Page Admins
Valeria Galescu
is there a way (like a template?) to make these without a Cricut machine?
Hi Jenn, these strawberries are so cool!!! I would love to make them with my kids but I don’t have the cricut machine :/ is there any way I could get a printable/template or I could even trace it out from a computer screen if there’s an actual (size) picture.. I don’t know-I’m just hoping for other possibilities 🙂
And if you don’t mind telling, where did you get the colored paper?
-Inna
I cannot even count how many of these strawberries I have made over the years using a template. I was thrilled when Cricut came out with one! What a timesaver! Sometimes I run the pieces through my Cuttlebug and swiss dot them before I assemble them. Yours look great! Thanks for sharing
These must be the cutest strawberries I’ve ever seen!! Sooo adorable!
Love these! But where does the cartridge come into play? (Novice)
I made the whole set without using any cartridge except where it says to assemble using the manual …. (I don’t have either)
The Cartridge was something you used with an Older Cricut machine. With the new machines you can get the image in Design Space. I should update this with how to make them with the new machines 🙂
Thanks! I also couldn’t figure out what the larger strawberry “tags” were for? Are they just name tags to assign them?
I might do these as ornaments for next years tree!
You’re so welcome. Where were you seeing larger strawberry tags? I don’t see them in Design Space with the image or in my post so I’m a little confused. They would be so cute as ornaments 🙂