This post may contain affiliate links. If you purchase something through any link, we may receive a small commission at no extra charge to you. Supplies used may be given to us free of charge, all projects and opinions are my own.
Have I made it pretty clear yet that I *LOVE* Halloween? I just do, I love the colors and the fun and the opportunity for kids to be creative and just have fun!
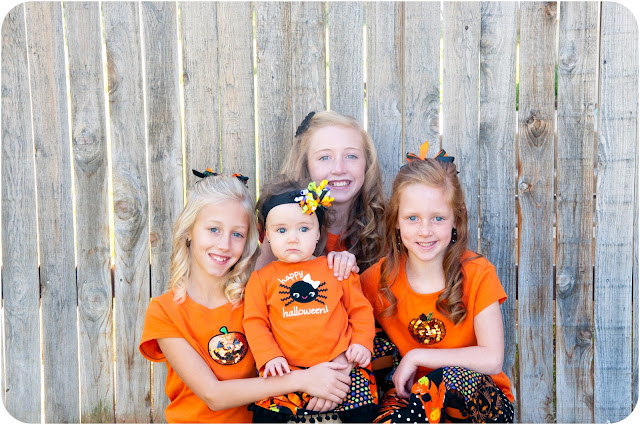
I may also be known (a little bit) for my love of dressing my kids alike and for the season/holiday. This year was no exception and possibly a little more *required*. The kids had their Primary Program at church during sacrament. This is always a big day for them and I thought something new and festive was the perfect fit (and it helped that it was just the day before Halloween and that we were having Halloween fun later on with the family).
So here are my beauties in their Halloween attire all dressed for church.
The boys also had cute Halloween stuff but it wasn’t church appropriate so they wore it later in the day.
Here’s the baby showing off her skirt
I had thoughts of doing a tutorial for the skirts but then thought of all the millions of them already out there for a cute basic twirl skirt so I just didn’t. Maybe next time!
I can go through and tell you what I did though and maybe if you’ve made one before it’ll help a little bit.
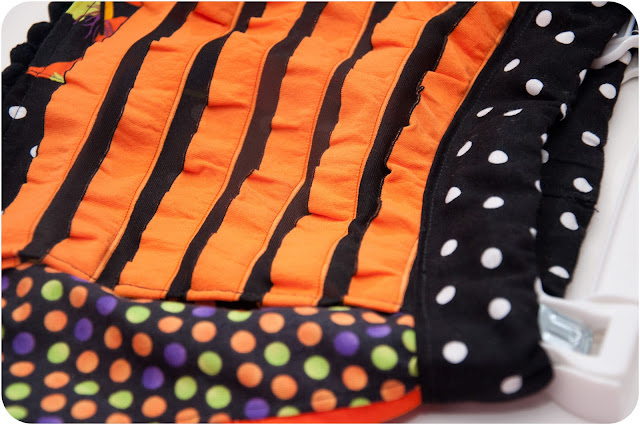
This is the baby’s skirt. Hers was the 1st one I did this year and is basically the same as the other girl’s (Miss B requested something a little different).
For her skirt I cut my strips 4″ wide and then the length I wanted the skirt to be, this was easily figured out by using a skirt that I liked the fit of and adding for seam allowance. Her skirt has 8 panels so 4×8 = 32″ before taking out for seam allowance. She doesn’t walk so she didn’t need “twirl” factor like the older girls did and I wanted the prints on the fabric to be seen so I kept it less gathered.
I used my surger to attach the panels to each other and then (gasp) ironed the seams down before top-stitching (this is pretty big for me…I usually skip that part and I will admit, it DID make it easier and was worth the time it took).
Once I had my panels all sewn together (except for the last 2 so it laid flat and wasn’t a circle yet) I laid my ball-trim on it basically the equivalent to right sides together (there is no right or wrong side to the trim) but the balls were hanging up toward the waistband of the skirt and then I ran it through the surger to attach the trim. After I did that I attached the last 2 panels turning the skirt into – well a skirt and then ironed the hem so that the trim was hanging down and then top stitched it into place so it stayed that way.
Once the bottom of the skirt was all done I put the top through the surger to finish off that edge. I had my waistband ready for me (figured out the width I wanted it and then doubled it so that when I folded it in half it would be the right width and then I took her measurement around her diapered bum and added 2″ so that it would be easy with the elastic in the waist to get up over her legs and bum.
I laid it out and fit the skirt into the waistband with the gathers the way I wanted and then pinned it in place. I went through and sewed the skirt to just the inside of the waistband, this made it really easy when I folded the waistband down over the outside of the skirt to figure out my placement for the apron piece (I KNOW I am not the only person in love with the ruffle fabric right? When I saw this orange & black I was so excited – why does it have to be so darn expensive though?).
Once I had it in place I just once again top stitched around (leaving an opening to put the elastic in) and that finished it off. For the elastic I just took her waist measurement and subtracted an inch. With her diaper bum it stays up fine and I didn’t want it tight on her chubby little belly. For the older girls I know I made them a bit tighter.
If you don’t sew I am sure this was probably very confusing so I promise I’ll get pictures next time and make it a more informative post (lucky for you there are quite a few holidays and birthdays coming up to make sewing pretty much a necessity!)
© The REAL Housewives of Riverton, 2011-2012. Unauthorized use and/or duplication of this material without express and written permission from this blog’s authors and/or owners is strictly prohibited. Excerpts and links may be used, provided that full and clear credit is given to The REAL Housewives of Riverton with appropriate and specific direction to the original content.
Latest posts by Creative Housewives (see all)
- The Best Vinegar Paint Brush Cleaner Method - May 6, 2023
- 10 Fun and Easy St. Patrick’s Day Games - March 1, 2023
- Valentine’s Day Felt Wreath DIY - January 20, 2023


My gosh that looks like so much work, but they are definitely bright and Halloween-y!
Aww! I want a little girl! My boys aren’t very cooperative when I try to make their clothes.
LOVE those skirts!!
Oh my gosh, those little ladies are too darn cute!
Love the halloween skirts!
gail
These are precious! Love it!
Too cute. LOVE the pom pom fringe. I’m hosting a giveaway at DIY Home Sweet Home.
I would love for you to stop by and check it out.
http://diyhshp.blogspot.com/2011/11/giveaway-shabby-apple-dress.html
thank you all so much, they were so much fun and I am so hopeful they’ll fit again next year! Ready to make Christmas skirts now!