This post may contain affiliate links. If you purchase something through any link, we may receive a small commission at no extra charge to you. Supplies used may be given to us free of charge, all projects and opinions are my own.
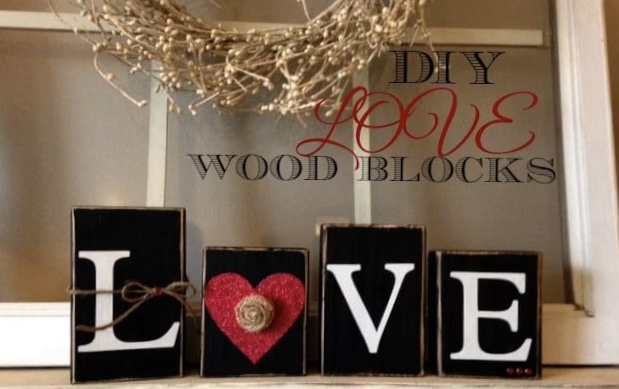
Let's make some DIY Valentine Love Wood Blocks. Every year when I'm finished taking my Christmas decorations down I feel like my house looks bare and boring. I decided I wanted more Valentine's Day decor this year so I'm making them.
Updated January 2022
Valentine Love Wood Block Tutorial
Valentine's Day can be hard to decorate for, sometimes the decor can be cheesy or child like (my opinion, don't hate me). I also really don't love a lot of pink in my decor so that can make finding things hard. I figured the best way to find something that would work with my decor would be to make my own. That's why I decided to make these valentine blocks.
I decided it made sense to add black to my Valentine's Day decor. It's classic and matches my home well.
Have you ever made projects with wooden blocks? They're a great beginner project because it's easy to get all the supplies to make them.
I loved how they turned out! I was surprised how quickly they came together. This is an easy project and I love having them with my Valentines Day decor. They were just what I had envisioned in my mind.

Love Wood Block Supplies:
Paintbrush (a foam brush works well)
Vinyl (I used white)
Transfer Tape (optional)
Black paint
Wood Blocks (cut from a 2×4)
Cricut machine (I used my Explore Air 2 but you could use any Cricut machine for this project)
Love Cut File
Ribbon, Jewels or Buttons (for decorating blocks)
Mod Podge – optional if you're using scrapbook paper for your letters
Computer or mobile device with Design Space to open the cut file
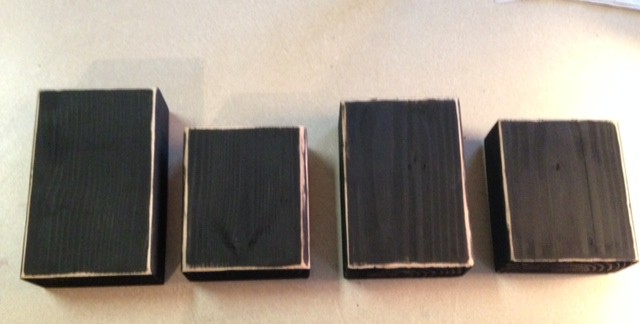
Note: my photo shows black vinyl and cream paint. I initially thought I would paint my blocks cream and use black vinyl but my shelf is cream and the black blocks looked better.
How to make DIY Valentine Love Wood Blocks:

Step 1. Cut your 2×4 into 3 different size blocks.
My measurements are as follows:
Large block (L) 5.5″ tall.
Heart block and E block 3.5″ tall.
V block 4.5″ tall.
Step 2. Sand the blocks until they are smooth.
This is how I made my love wood blocks, you can always resize the blocks to fit your area.
Paint and Sand blocks
Step 3. Paint your blocks and let them dry. Don't forget the sides of the block.
Make sure and let the paint dry completely, I like to let them dry over night when time allows, this makes applying vinyl a lot easier.
Step 4. This step is optional. I decided it would look good if I sanded the edges of the blocks. Sand the top, bottom, and side of the block.
I used a sander, you could also use a sanding block. Personally I like that look but if you don't like the aged/worn look you don't have to do this step.
If you do sand, when you're done sanding dust the blocks really well. I like to use a lint free cloth like an old t-shirt.

Step 4. I cut the letters for my love blocks with my Cricut machine. It worked so well. I used white vinyl for the letters and red glitter vinyl for the heart. If you don't have a cutting machine you could always use white and red paint with a stencil to paint your letters.
These letters are pretty easy to apply like a sticker. If you're worried about that use Transfer Tape. The trick is to not really press the vinyl down until you're sure you have it in the spot you want it. It helps to start at the top of the letters and then smooth the letters down slowly.

Stain Edges of Block
Step 5. This is another optional step. I love the rustic look. I used Minwax stain in Special Walnut and applied it to the sanded sides of each block.
It's very easy to apply just take an old rag, t-shirt, or towel and dip it into your stain and rub over your wood. I love how it makes the wood look. This step isn't really necessary if you didn't sand your wood blocks.

I added some jute around the “L” and glued on a little red jewel I had in the center. I also glued a rose onto my heart made out of burlap I found in my craft room and glued little red jewels to the bottom “E”, it was a sweet addition.
The fun thing about making these blocks is you can paint and add any ribbon or tulle or jewels you want to create the style you like. You could also have them say something else like “be mine” or “Valentine”. I love how it looks on my shelf, it's a perfect way to add a little Valentine decor to my house. I can't wait to make more decor pieces for my home this year!
If you like this project check out these other Valentine projects we've made.


- The Best Vinegar Paint Brush Cleaner Method - May 6, 2023
- 10 Fun and Easy St. Patrick's Day Games - March 1, 2023
- Valentine's Day Felt Wreath DIY - January 20, 2023

I love these! Best part – easy enough for me to try!
Thanks for sharing, pinned.
Jennifer, so glad you like them. I hope you’ll share your project with us if you make them! Have a great day.
[…] use it for a Halloween banner but I never did. I thought the paper would look really cute with the Love wood blocks I just made. I have to tell you the blocks and this plaque have been so fun and easy to make. I […]
[…] 10 – DIY Valentine Love Wood Blocks […]
[…] out our other fun Valentine posts below! Love Blocks Valentine Plaque Valentine Treat Box Valentine Rice Krispie Treats Valentine Blonde […]