This post may contain affiliate links. If you purchase something through any link, we may receive a small commission at no extra charge to you. Supplies used may be given to us free of charge, all projects and opinions are my own.
Do you have a dragon lover in your house? We have had so much fun with dragons over the years but the highlight has to be our Dragon birthday cake! We love how this turned out so much we knew we had to share our experience making it. This delicious cake is perfect for birthday celebrations or even for Chinese New Years.
(Updated 1/2022)
How to make a Dragon Birthday Cake
For his 5th birthday my little boy Morgan was so cute and VERY specific with his cake request. “I want a fire breathing dragon cake!” I thought it was a great cake idea. If you know me you’re not surprised that I immediately panicked because Paula was going to be out of town but couldn’t let him down. I love that he had faith in me that I could make it for him.
If you’re anything like me, when faced with the near impossible I hit up the internet. Good news is the internet didn’t let me down. Someone else needed a fire breathing dragon birthday cake too. Their dragon cake tutorial is great and I followed it closely. I did make some changes and I’ll share them below. This is such a fun cake
Supplies needed for a Dragon Birthday Cake
2 – 8, 9, or 10″ circle cakes (use a pan like you would for cake layers)
1 – standard marshmallow
2 – Rolos
Frosting, I used 3 tubs (you could also use homemade buttercream frosting)
8 – Chocolate covered graham crackers (for the back and tail of the dragon)
4 – Fruit Roll ups – you will need 1 for each wing and then 2 – red/orange/yellow rollups for the fire.
2 – Chocolate Chips
2 – Wooden Skewers
14 – Orange Slice Wedge Candies
Sheet Cake board (or serving plate about the same size)
Serrated Knife
Dragon Birthday Cake assembly
In the original tutorial they used a 9″ round cake pan. I did not have a 9″ cake pan so I used a 10″. You’ll notice mine takes up a lot more room on the cake board. That’s why. This was my first time making this cake and it worked well. You could also make a smaller version using an 8″ cake pan. You’ll use the whole cake.
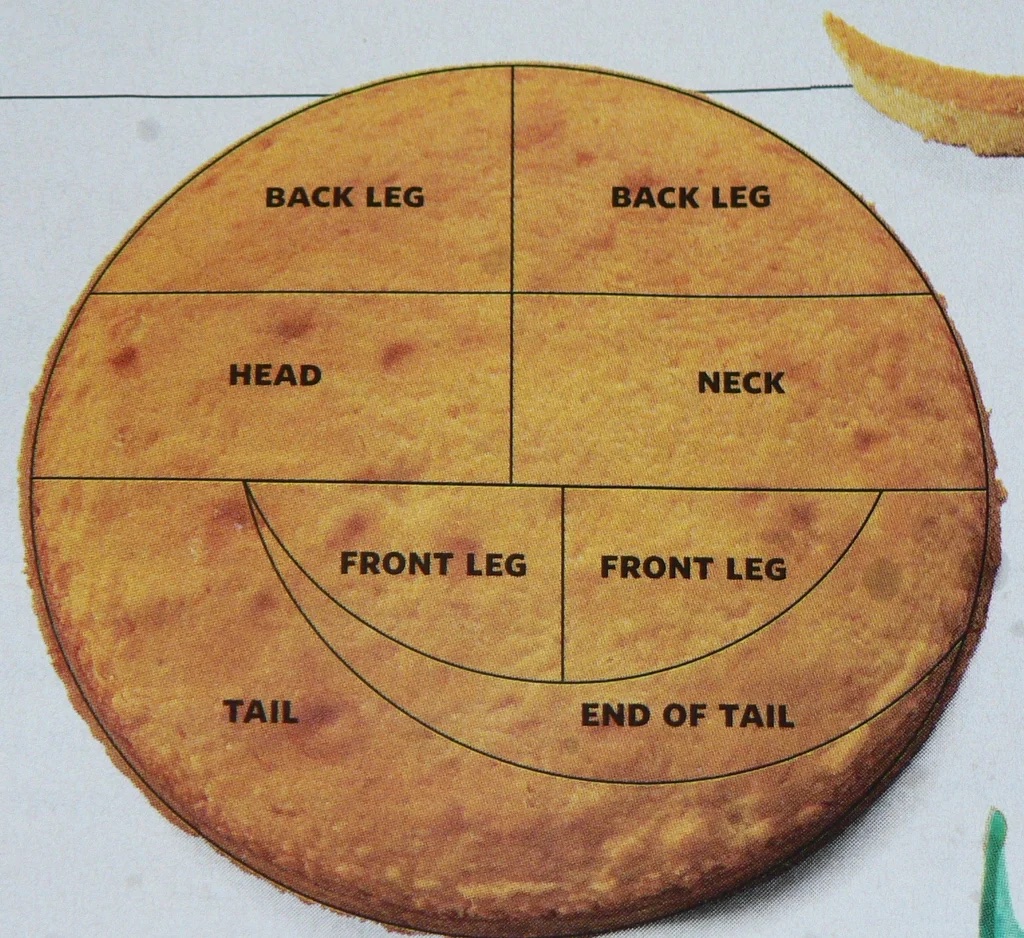
How to cut your dragon birthday cake.
To create your fire breathing dragon birthday cake you’ll cut one of your round cakes in half for the body using the whole thing and the other as shown above for the dragon parts.
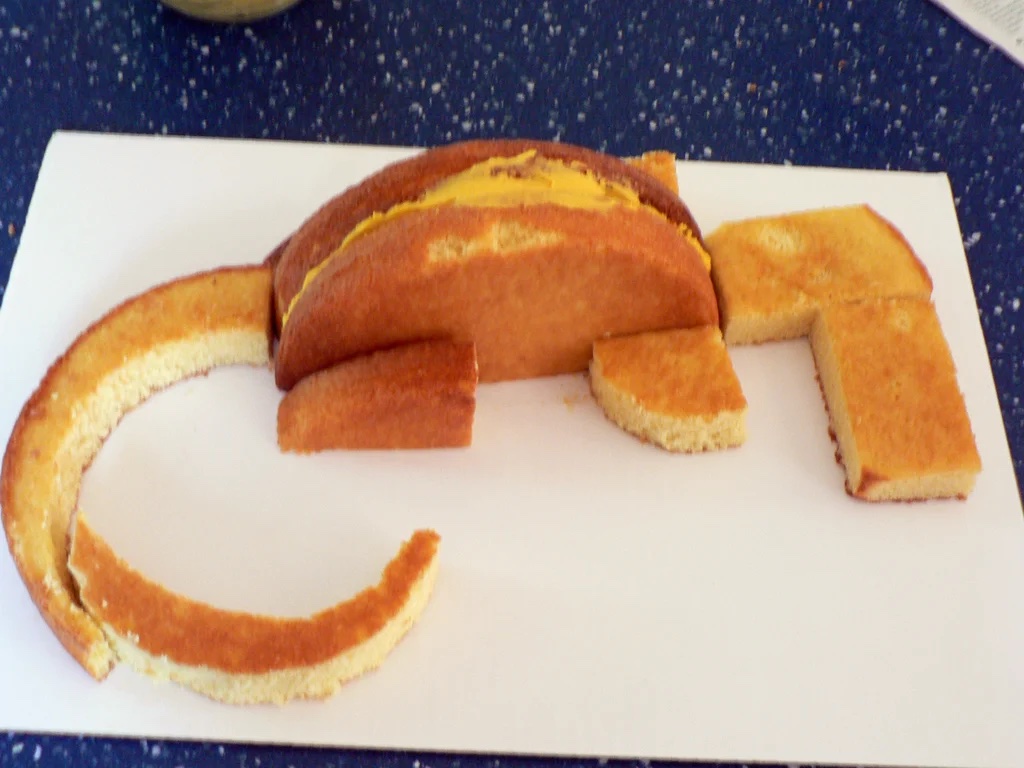
Dragon birthday cake assembly.
You’ll assemble your cake pieces regardless of what size cake you baked as in the photo above. Use frosting to stack the two half circles for the body making sure the more flat side is facing out.
When it comes to frosting your cake it will be a little more difficult than a normal cake because there are so many cut pieces of cake. You’ll want enough frosting to make sure you can do a crumb coat. I used white frosting for my crumb coat and then frosted with green frosting. I used 3 tubs of white frosting colored green and did have leftovers. You can pick whatever colors you want, Morgan thought a black dragon or red dragon would also be fun
To create the scale look use the lid to a marker. Make sure you wash the marker cap and then get to work. I tried hard to never press it in for a full circle. The half and 3/4 circles make a great scale look. You could also use a round tip, like for frosting and get a similar look.
Dragon cake details
To create the spikes use chocolate covered graham crackers. You’ll cut them so they are a triangle. You’ll end up with the middle section cut out and won’t use that piece. I used a total of 8 chocolate covered graham crackers but recommend having more than 8 on hand. The corners can crumble or break and I didn’t want that. Place them cut side down along the tail and body.
For the eyes I cut one marshmallow in half at an angle. This makes the eyes look more forward rather than straight up as they would if you just cut them in half.
Chocolate chips make the center of the eyes. I couldn’t get the chocolate chips to stick into the marshmallow so I cut the tips off and used a little white frosting to attach them. It worked really well.
The original tutorial calls for 2 Hershey Kisses. I didn’t have any on hand and a full bag is like $4.00 so instead I used Rolos. A roll of Rolos is $0.69! They worked perfectly.
For the eyebrows and claws I used Orange Slice candies. You can usually easily find these in the bagged candies for like $1.00.
Making the wings and fire.
In the original recipe they used solid colored fruit roll-ups. I had NO luck finding solid ones but I think that worked to my favor. They had “orange fire” fruit roll-ups when I made my dragon birthday cake and it worked so great for the fire breath. Your wings can be whatever colors you want. Mine are a blue/green tie dye look.
For the wings and fire I just freehand cut them with a knife. To create the wings I cut my shape and then trimmed the corner a little to make it easier to wrap around the skewer. I recommend not putting the wings on the cake until you’re ready to serve it as they might slide down.
Finishing Touches.
Morgan was convinced that he needed to have guys fighting his dragon. We have a large collection of Imaginext toys. He selected a Knight and a Viking to fight the dragon. He said “I think they would want to fight a dragon for glory.”
I placed the guys on the cake board once we had the cake set in place and added candles to the front foot and wrote Happy Birthday on the cake board.
I was really happy with how this all came together. It was SO MUCH easier than I thought it would be and I’m very grateful for people who share their talents. Thanks to other people sharing I was able to make my son’s birthday cake wishes come true!
I really really love how this cake turned out. It’s so fun and looks like a real dragon (even if he looks more friendly than like a realistic dragon). It was the perfect cake for Morgan’s birthday party. After serving your homemade cake make sure and fully cover the remaining cake air tight to keep it fresh.
Here’s a throwback to another of his birthday cakes. His dinosaur cake is another favorite!

I hope you enjoyed this dragon cake tutorial and we would love to see your cake if you make one!

FAQ:
Q. Can I use a bundt cake pan? A. I don’t know how that would work for this particular cake but if you figure it out we would love to see it!
Q. How would I make a cake look like a baby dragon? A. I’ve been temped to try a smaller cake pan to make baby dragons, I haven’t yet though. Dragon toppers could be a fun way to add baby dragons too!
Q. Can I use aluminum foil to wrap the leftovers. A. You could, I wouldn’t do it very long. It isn’t quite as air tight as plastic wrap.
Q. Can I use a marshmallow fondant instead of frosting? A. You could. It would give you a different look for sure. You could also try a buttercream icing instead of canned frosting.
- Bringing Home Baby Chicks - March 11, 2025
- Is RootsTech for Moms? - February 23, 2024
- How to Get Oil Stains Out of Clothes - May 5, 2023



That looks awesome!!! Great job!!!
Thank you!!!
Oh I love this – my boys would have loved this when they were little! You did a great job!
Thank you Summer. It was so fun!
~Jenn
This is super cute! Now if only one of my girls wanted a dragon breathing fire cake.
I bet it wouldn’t be TOO hard to convince them – it has chocolate, cookies and fruit roll ups!
Thanks.
Holy Hannah! That cake is amazing! Wow!
~Steph @ Silver Boxes
Thanks Steph! It was really fun.
I also have a little man requesting a dragon cake–which tutorial did you use? 🙂
Hello! What size board did you use to build the dragon on please?
We used just a standard sheet cake sized board. You can find them at Walmart or most craft stores 🙂
What kind of cake did you use? Box?
Or homemade recipe?
Since this was for a kid party I happily used a box cake mix!
Did you assemble this the day of? Or did you make ahead of time?
I did this one all the day of 🙂
Thank you for the tutorial! It helped me make a dragon cake for my miss 4’s birthday party 🙂
I love hearing this 🙂 I’m glad you found it helpful!