This post may contain affiliate links. If you purchase something through any link, we may receive a small commission at no extra charge to you. Supplies used may be given to us free of charge, all projects and opinions are my own.
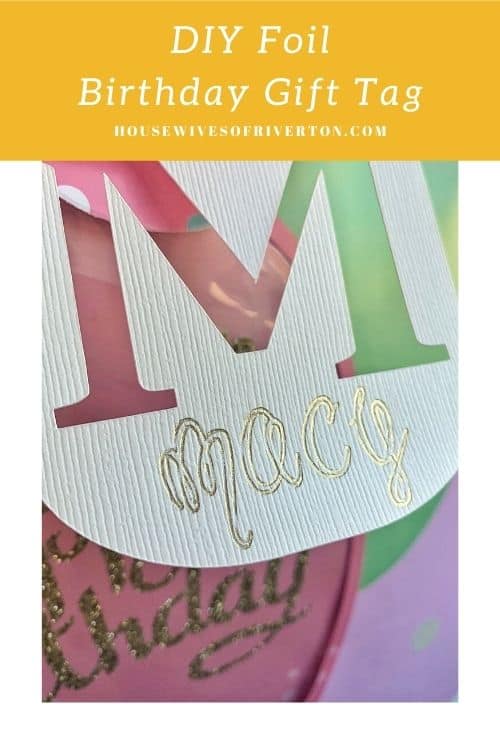
We’re officially in love with foiling everything. We’ll help you create your own DIY foil birthday gift tag using the new Cricut Foil Transfer Kit.
This page may contain affiliate links. There is no increase in cost to you. Links are provided for your convenience.
Why make a DIY Foil Birthday Gift Tag?
When we heard Cricut was releasing a new tool that would allow us to foil our projects we had to get our hands on it. We rushed out the day the Foil Transfer Kit was released and brought it home.
I have always loved personalizing things. Gifts, wrapping, signs, the list goes on and on.
Sometimes the perfect gift can’t be personalized but that doesn’t mean the wrapping can’t be. Our cute little niece had her 2nd birthday at the perfect time. I had a new toy I couldn’t wait to use.
Creating this foil birthday gift tag was so fun and actually really simple. There was no question who the gift was for and look at how that gold sparkles.
What do I need to make a Foil Birthday Gift Tag.
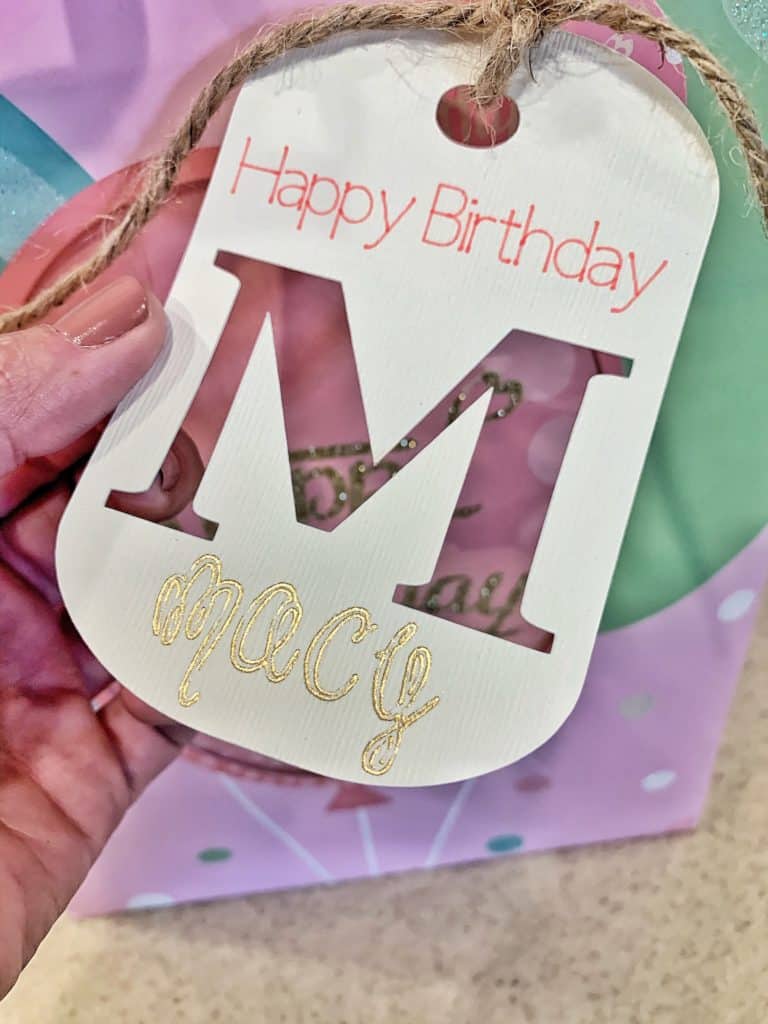
To create your DIY foil birthday gift tag you’re going to need the following supplies:
- Cricut Machine (Explore Air 2, or Maker)
- Cricut Foil Transfer Kit
- Gold Foil Sheet
- LightGrip Mat
- Cricut Pen (I used pink)
- Cricut Design Space
- White Cardstock
How to create a Foil Birthday Gift Tag?
Once you have your supplies gathered open Design Space on your computer. To use the Foil Transfer Kit you need to use a computer not a phone or tablet.
I knew I wanted to make a monogram gift tag. I started by simply searching the first letter of our nieces name – M.
The first image this search brought up was the tag I ended up using. I searched almost every other letter and it was always the first image. The image set is called “Base Camp – Dog Tags”.

I selected the image I wanted and then once it was on my canvas I started playing with the size. I also changed the color to white since I would be using white cardstock.
I knew I wanted to have Happy Birthday on the tag and also wanted to have the name in gold foil.
This meant manipulating the size. I needed the tag to be wider to fit Happy Birthday but I didn’t want it to end up being giant.

What size did I make my tag?
I ended up making my tag 3″ wide and 4.5″ tall. This was the perfect size for tying onto the gift bag.
Once the size of the tag was figured out I added a draw layer for Happy Birthday.

The font I used is a Cricut font – Cricut Sans, I thought it looked good with the monogram M font.
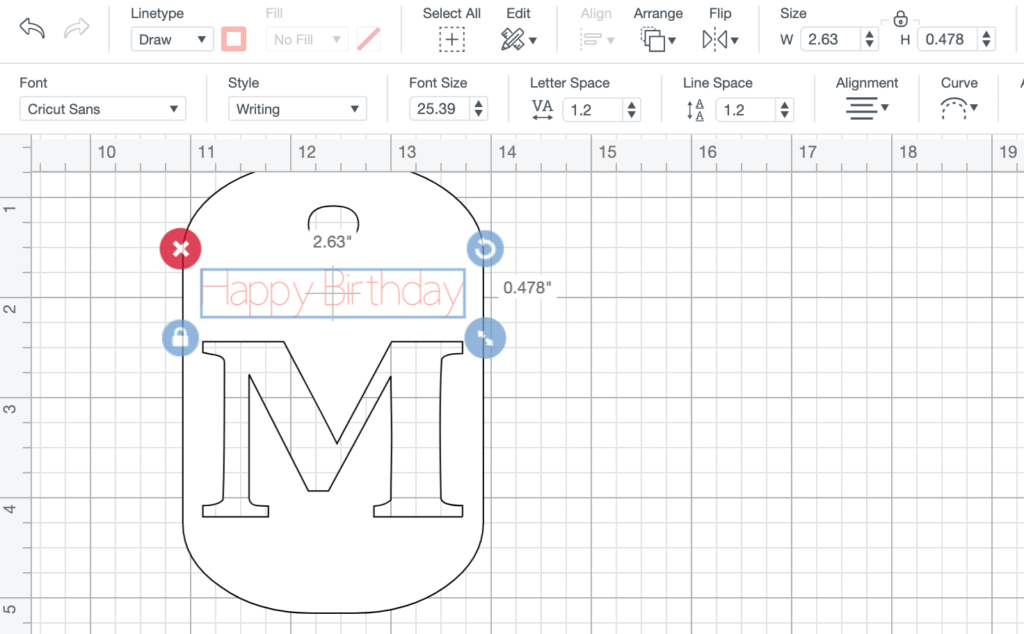
Here you can see in the toolbar the font size, style, letter spacing, etc. Have you used the alignment tool? It’s my favorite for centering two layers perfectly.
The last step for creating the gift tag is adding the foil layer.
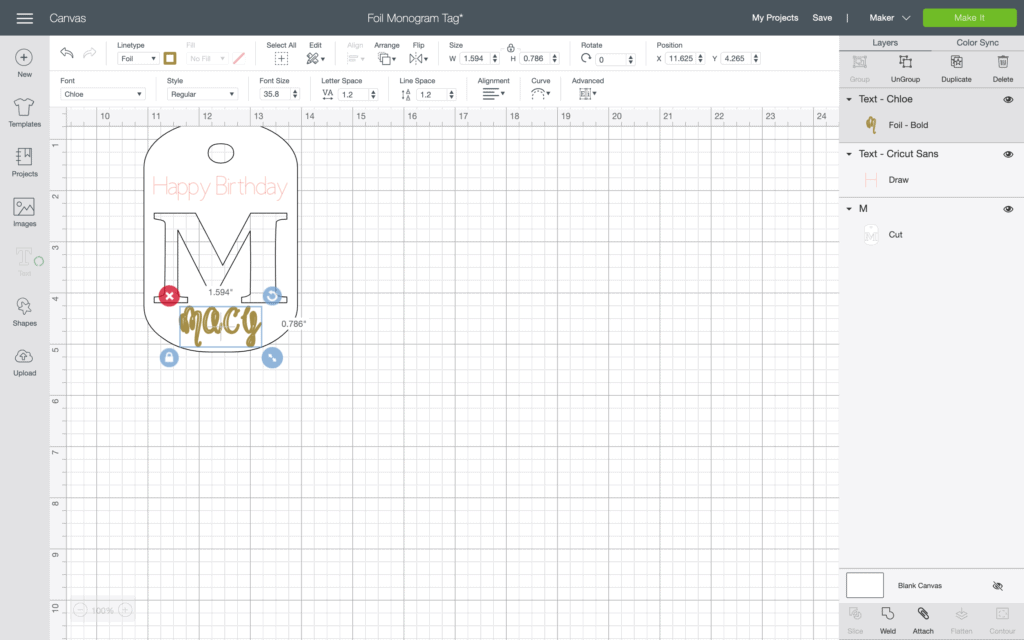
How do I add a foil layer?
Adding a foil layer is just like adding a draw layer. In the Linetype dropdown menu select foil. I used another Cricut font – Chloe, for the foil layer. Make sure and use your alignment tool again to make sure everything is centered.
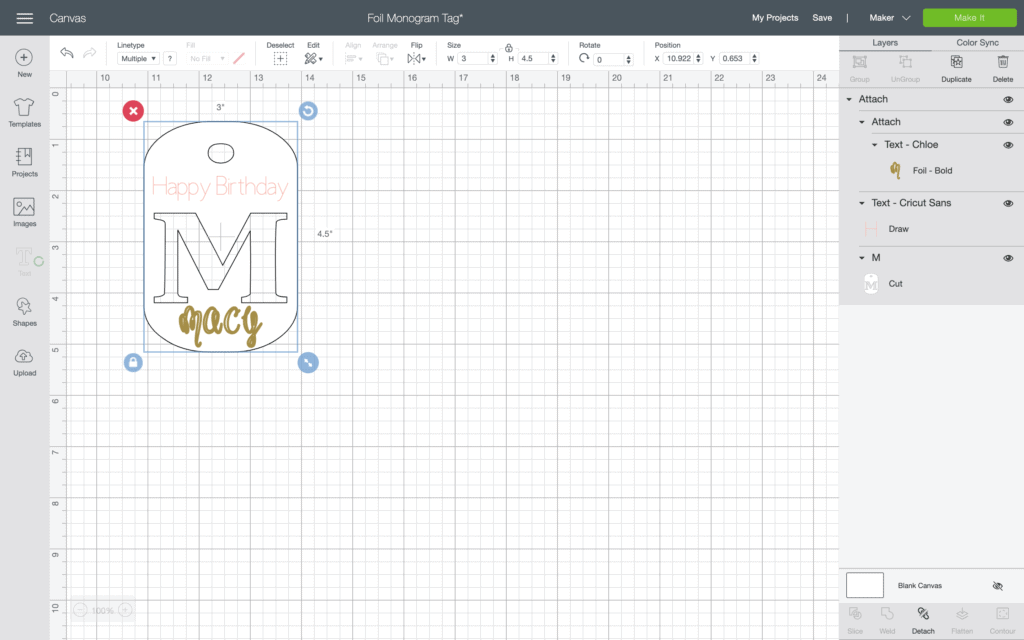
Once you have everything where you want it, select all the layers and attach them. Attach is the magic tool for getting your writing exactly where you put it on the canvas. Attaching all the layers should put them all together on the mat screen.
Note – I am using a Maker. Your screen may look slightly different if you’re using a different machine.
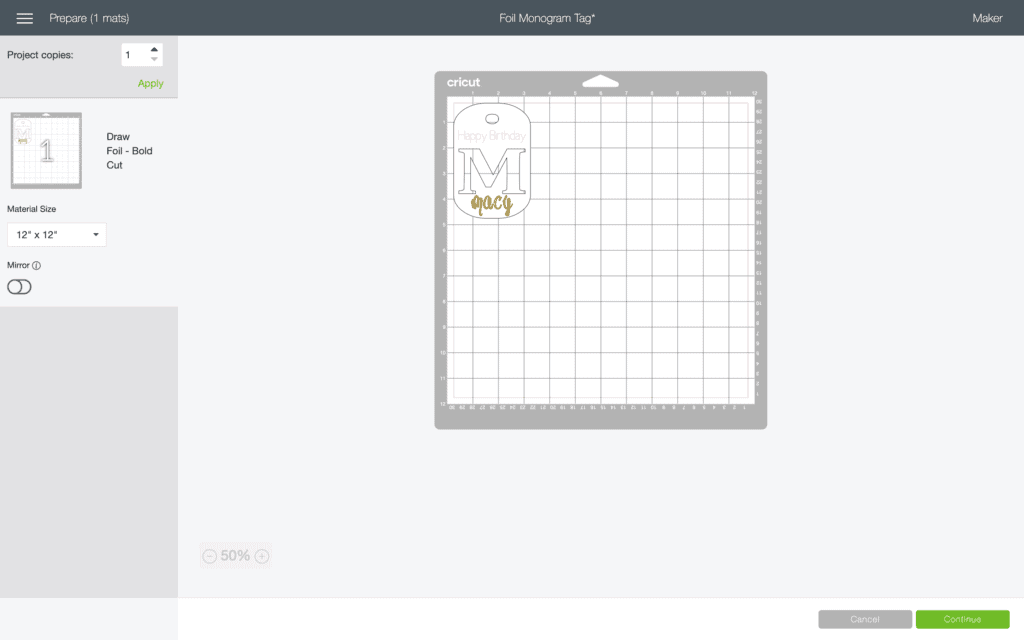
Here is the mat screen. You can see the project looks the same here as it did on the canvas. You can also see, on the left, that we have a draw, foil, and cut step in the project.
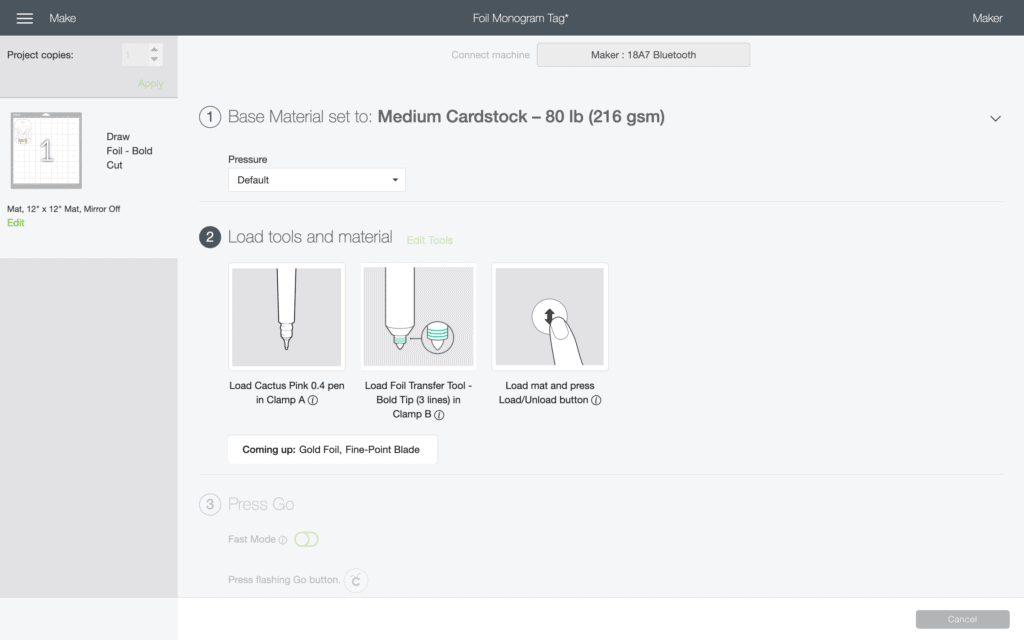
This is one of my favorite screens in all Design Space. If you follow the steps on this screen you can almost not go wrong.
From top to bottom you see that it’s telling us the base material we selected, medium cardstock.
Then it tells you what tools to load in your machine. In Clamp A I should load Cactus Pink 0.4 pen. In Clamp B I should have my Bold Tip of my Foil Transfer Tool.
Then it says to load the mat and press the Load/Unload button (which is flashing on the machine). I love that it also tells you what’s coming up next.
Place your cardstock on your blue LightGrip mat. Here’s something to note – pay attention to texture on your cardstock.
What’s wrong with textured cardstock?
Normally I love texture and luckily it ended up working okay on this project. I think my foil would have went on a little smoother if I had used the other side of my cardstock. You can see the texture and how it isn’t perfect here.
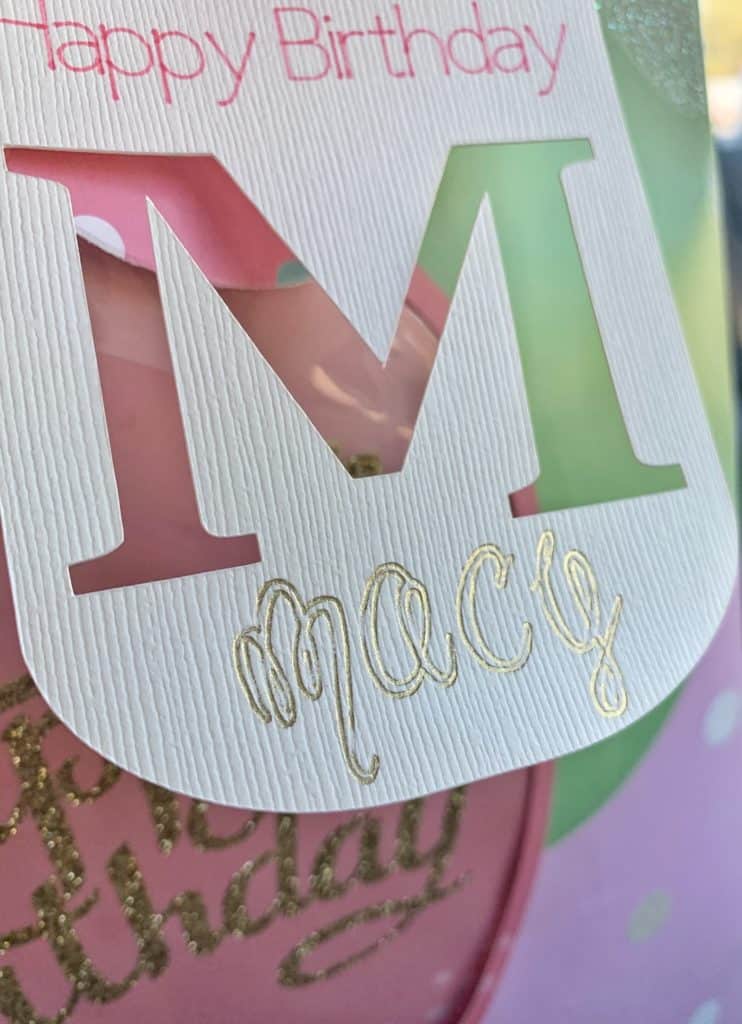
Once your cardstock is on your mat and loaded in your machine push the flashing C on your machine.
The first thing your machine will do is write “Happy Birthday”.
Once it’s finished writing you’ll need to tape your foil onto the cardstock without unloading the mat first. Make sure you’re covering the area where your word will write fully.
Is it easy to use the foil?
When taping the foil down, you want the foil side up. I thought I knew what I was doing my first attempt and assumed the foil needed to against the paper. That is not the correct way.
Make sure you tape your foil down nice and tight without any wrinkles. This will give you the best results.
Push the flashing C on your machine and let the foil magic happen.
Once it’s done with the foil – without unloading the mat – remove the foil from your cardstock. Take the pen out of Clam A and the Foil tool out of Clamp B. Place your blade in Clamp B and push the flashing C on your machine.
This time your machine will cut out the tag. When it’s done you can unload the mat.
Especially when working with cardstock, to remove the material from the mat I like to roll the mat off the cardstock instead of pulling the cardstock off the mat.
This prevents the paper from curling which makes the finished product look much nicer.
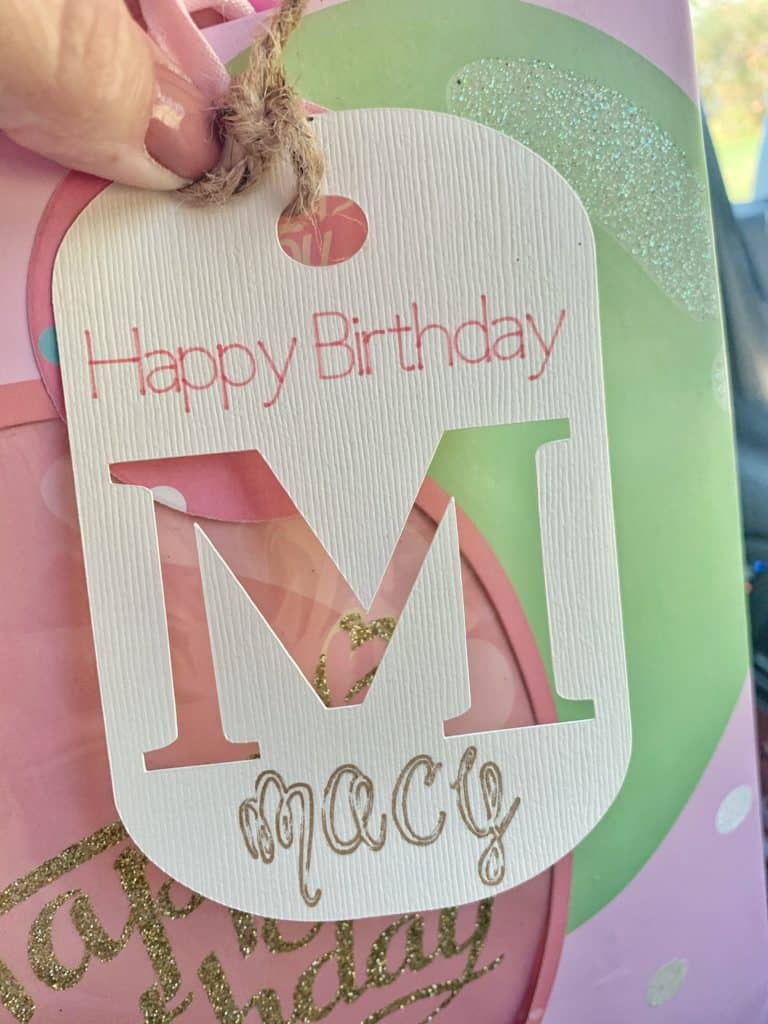
This was such a fun project to make and I love how it turned out. I can see myself making a lot of these for upcoming birthdays. I’m already excited about personalizing gift tags for Christmas gifts!
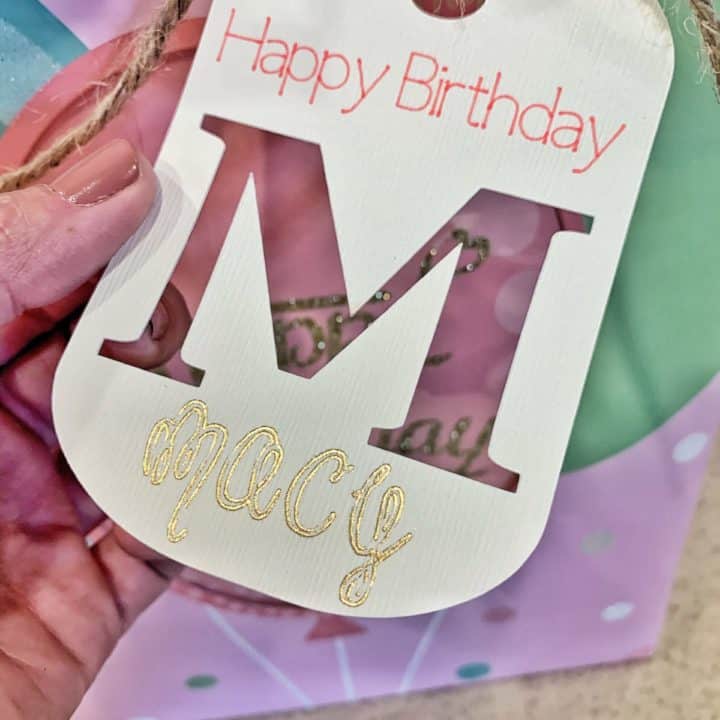
DIY Foil Birthday Gift Tag
Create a personalized Foil Birthday Gift Tag in minutes with this tutorial.
Materials
- Cricut Gold Foil Transfer Sheet
- White Cardstock
- Twine
Tools
- Cactus Pink 0.4 Fine Point Pen
- Cricut Maker
- Cricut Foil Transfer Kit
- LightGrip Mat
Instructions
- In Design Space search the letter you want cut out on your tag. This should bring up the "Base Camp - Dog Tag" image as the first image.
- Resize your image to 3" x 4.5" (this will require using the unlock tool).
- Using Cricut Sans Writing font in Design Space type Happy Birthday. Font size 25.39 with a letter space of 1.2.
- Change Happy Birthday linetype to Draw and select the color and pen size you'll be using.
- Select both layers and then using the alignment tool center horizontally.
- Using Cricut Chloe font type the name you want on your gift tag.
- Because the length of your name and height of letters will likely be different than mine resize until it fits the way you want under the initial cut out.
- Change linetype to Foil and select which size foil transfer tool you want to use (I chose bold).
- Select all 3 layers and using the alignment tool center horizontally.
- Select all 3 layers and click attach. This will ensure your writing and foil are placed on the tag when the project is finished.
- Place carstock onto lightgrip mat.
- Load pen into Clamp A.
- Load Foil Transfer Tool into Clamp B.
- Load mat into machine and press flashing C.
- After machine has written Happy Birthday without unloading mat apply foil (foil side up) to cardstock. Make sure you cover the area the word will write and tape foil down well.
- Press flashing C and let machine foil cardstock.
- Without unloading mat remove foil from cardstock and replace Foil Transfer Tool with FinePoint Blade in Clamp B.
- Press Flashing C and let machine cut out initial letter and tag.
- Unload mat when finished.
- Roll lightgrip mat off cardstock and remove tag.
- Using twine attach foil birthday gift tag to gift.
Notes
You must use a computer (not a tablet or phone) when using the Foil Transfer Kit.
Make sure you tape your foil transfer sheet down nice and tight with the foil facing up.
Don't unload the mat until prompted to on the computer screen.
Recommended Products
As an Amazon Associate and member of other affiliate programs, I earn from qualifying purchases.
-
 Limited Time Offer: HowenDay 328 Feet Natural Jute Twine String for Crafts, Weddings, Christmas Gifts, and Gardening Applications- Made of All Natural Jute String Measuring…
 -
 Colorbok White 12x12in Smooth Cardstock
 -
 Cricut Ultimate Fine Point Pen Set, 30 Pack, Assorted
 -
 Cricut, Gold Foil Transfer Sheets, (8 ct), 30.5 cm x 30.5 cm (12" x 12")
 -
 Cricut LightGrip Adhesive Cutting Mat 12"x12" - For Cricut Explore Air 2/Cricut Maker - 3 Pack
 -
 Cricut Maker, Lilac

We have a great discount for our crafting friends! Click and use code Housewives for 10% off and free shipping on purchases over $50! *Not valid on machines, Cricut Access memberships, or digital image purchases*
If you enjoyed this Cricut project make sure and check out these other fun projects we’ve made with our Cricut!
- Bringing Home Baby Chicks - March 11, 2025
- Is RootsTech for Moms? - February 23, 2024
- How to Get Oil Stains Out of Clothes - May 5, 2023

